Chase away those Monday blues with a large dosage of deep dark bittersweet chocolate that comes in various lusciously divine forms in this month's Sugar High Friday round-up prepared by Lovescool.
Monday, October 24, 2005

IMBB 20 - Has My Blog Fallen?
This month's IMBB hosted by Kitchen Chick (such a cute little taro chickie dim sum she has as a header!) was a real challenge for me as I went through the downs and ups of making souffles throughout my weekend. It was also one of my busiest weekends in terms of food events as it felt like a non-stop marathon of baking and cooking. Luckily I was all for it since I have not been in my kitchen for quite some time.
When I started planning my menu, I decided that I will use different containers to bake my souffle in. My original plan was just a sweet and savoury souffle each for the event but somehow I ended up making four souffles this weekend! Here goes my very long story on my "souffley weekend" which does have a happy ending at the end of it:
My weekend kicked off on a slow start as I was still a bit doozy from preparing for Sugar High Friday plus we had a nice buka puasa dinner on Friday night. (No pictures of food as we were late and all the food was almost gone by the time we queued!) Hence it was only after lunch before I started making my Apple Souffles which I got from a cookbook called Dangerous Desserts. Caramelising the apples and cooking their sauce was very relaxing. Then came the tough part, trying to carve my Red Delicious apple to fit my souffle. It was especially hard as I panicked a bit when I saw the insides turning a bit brown so I kept brushing it with lemon juice in between my carving efforts. Cooking the apple to a pureed state took a while so I had to blend them. The souffle mixture was easy to make and I filled up my apples and some glass ramekins I had. Not too sure why but the souffles in my ramekins puffed up while the apple ones didn't puff up as much as I liked. I reckon it could because the sides are not straight enough or I had not filled up apple cups until the brim to make it overflow on top. Never mind, it tasted great with the caramelised apples which I had added lots and lots of lemon zest. I won't share the recipes here (except the last souffle) as it will be an extremely long post if I do but if you wish for copies, email me.

I wasn't too satisfied with my apple souffles as I wanted a puffed up top but I decided not to worry about it too much as I had to cook for my Blog Party which took the whole night to cook, take pictures and write up. The writing took so much of my time as I had some technical problems posting that by the time I finished, I was yawning my head off. The next morning after a great night's rest, I made my savoury souffle. I wanted something small and simple so I chose to make a Stilton Souffle Stuffed Mushroom. The recipe is from the BBC's Food website and was featured in Ready Steady Cook by Ross Burden. There was another similar recipe by Paul Rankin but I decided on this one since it used chef's rings and had no cream in it. As it was an Internet recipe, I also had no picture to guide me on what the end result looked like.
The souffle was a small puff on top of the portobello mushroom but I had a bit of liquid pouring out from the bottom which I suspect should not happen. However, it tasted great and made a light brekkie for me before I went out for the day. Before I went out, I did some surfing and thumbing through the other entries, I was a bit forlorn as I so wanted a souffle with a lovely high top.

When I started planning my menu, I decided that I will use different containers to bake my souffle in. My original plan was just a sweet and savoury souffle each for the event but somehow I ended up making four souffles this weekend! Here goes my very long story on my "souffley weekend" which does have a happy ending at the end of it:
My weekend kicked off on a slow start as I was still a bit doozy from preparing for Sugar High Friday plus we had a nice buka puasa dinner on Friday night. (No pictures of food as we were late and all the food was almost gone by the time we queued!) Hence it was only after lunch before I started making my Apple Souffles which I got from a cookbook called Dangerous Desserts. Caramelising the apples and cooking their sauce was very relaxing. Then came the tough part, trying to carve my Red Delicious apple to fit my souffle. It was especially hard as I panicked a bit when I saw the insides turning a bit brown so I kept brushing it with lemon juice in between my carving efforts. Cooking the apple to a pureed state took a while so I had to blend them. The souffle mixture was easy to make and I filled up my apples and some glass ramekins I had. Not too sure why but the souffles in my ramekins puffed up while the apple ones didn't puff up as much as I liked. I reckon it could because the sides are not straight enough or I had not filled up apple cups until the brim to make it overflow on top. Never mind, it tasted great with the caramelised apples which I had added lots and lots of lemon zest. I won't share the recipes here (except the last souffle) as it will be an extremely long post if I do but if you wish for copies, email me.
I wasn't too satisfied with my apple souffles as I wanted a puffed up top but I decided not to worry about it too much as I had to cook for my Blog Party which took the whole night to cook, take pictures and write up. The writing took so much of my time as I had some technical problems posting that by the time I finished, I was yawning my head off. The next morning after a great night's rest, I made my savoury souffle. I wanted something small and simple so I chose to make a Stilton Souffle Stuffed Mushroom. The recipe is from the BBC's Food website and was featured in Ready Steady Cook by Ross Burden. There was another similar recipe by Paul Rankin but I decided on this one since it used chef's rings and had no cream in it. As it was an Internet recipe, I also had no picture to guide me on what the end result looked like.
The souffle was a small puff on top of the portobello mushroom but I had a bit of liquid pouring out from the bottom which I suspect should not happen. However, it tasted great and made a light brekkie for me before I went out for the day. Before I went out, I did some surfing and thumbing through the other entries, I was a bit forlorn as I so wanted a souffle with a lovely high top.
I decided to make another souffle as I so wanted a puffy top one so I chose this recipe that said, fail proof chocolate souffles from my BBC Good Food magazine. Can you believe I failed in making them? Maybe it was a combination of factors but I suspect I did not beat my egg whites enough before I folded them in. Nevertheless they tasted great although not souffle like and photographed like a dream as I took them on a sunny Sunday afternoon. They were also incredibly decadent with a scoop of coffee ice cream and bittersweet chocolate sauce that they would have been perfect for SHF instead.

I moped around, counted the hours before my deadline for IMBB and thought I will give it one more try after dinner. After a yummy dinner of spicy Chinese food with friends, I was inspired to get it right. Maybe it was all those chillies I consumed which is supposed to boost my Vitamin C but I struck success with my souffle. It rose beautifully that I almost wanted to weep with joy! Not only that, it was beautifully straight and not crooked. Only bummer was my picture quality was a bit compromised since it was almost midnite when I took it. Never mind as I am happy that I can make souffle and I found a fool proof recipe. I ate my oh so light souffles with gusto and wow, they were fantastic. It was sweetish from the icing sugar I sprinkled on top with a slight tang from my cream cheese and so fluffy that it melted in my mouth leaving such an airy feeling.

The great thing about this recipe I found in my Olive magazine that came from Paul Merrett and the BBC television show, Ever Wondered About Food? is they explain to you the science behind the methods.
Sweet Cheese Souffle (Makes 4 small ramekins)
1 tablespoon plain flour
25 grams softened butter, plus extra for buttering
60 ml (4 tbsps) milk
80g Philadelphia Cream Cheese
4 eggs, seperated
4 tablespoons sugar, plus extra for dusting
Icing sugar to dust
To make the base, mix the flour and butter together to form a paste - this is cold raw roux called a beurre manie. Warm the milk and cream cheese in a saucepan until the cheese is melted. Add the paste (beurre manie) and whish it in, the heat will activate the starch and cook any floury taste. Cook for about three minutes, as this a fat heavy mixture, it will stick to the pan easily so keep stirring to stop it. Whisk the egg yolks with 1 tablespoon of caster sugar and add to the cheese mixture, stirring for 2 minutes to cook the eggs. Remove from heat.
To prepare the ramekins, first butter them thickly and evenly and then chill until the butter has set. Butter them again to make sure they are well covered. Then tip some sugar into one and tilt the ramekin untul the entire surface is dusted with sugar. Tip the excess sugar into the next ramekin and so on until all four ramekins are dusted with sugar. Don't chill them at this stage or the sugar will weep.
Heat the oven to 180C. Whisk all the egg whites to almost stiff peaks, whisking in the remaining caster sugar towards the end. Mix a dollop of egg white into the souffle base taking care not to knock too much air out of the whites. Carefully fold in the rest of the souffle mixture. Spoon into the ramekins filling them right to the top. Be careful not to scratch the buttered and sugared surface or drip any mixture down the sides; if you creat any "drag" at this point, your souffle will be lopsided. Bake for 10-12 minutes until risen and pale gold. Dust with icing sugar and serve as is or with some fruit and whipped cream.
Tips:
You can open the oven door to check on it but close it carefully as if closed too quickly the cold air is pushed in and will affect your souffles. The souffle base forms the structure and flavour while the folded in egg whites makes it rise. The heat makes the air bubbles in the egg white expand while the protein in the base sets, trapping the enlarged air bubbles.
You need a straight side for the souffle to rise and buttering and sugaring it gives it a rough texture so the souffle has something to grip on when it climbs the side of the ramekin. The souffle base is easier to work with if warmer so if it is fridged, bring it back to room temperature before you mix in the egg whites.
Hope you enjoyed my souffle stories and thanks so much to Kitchen Chick for choosing the theme.
Tagged by Technorati: IMBB # 20 + Souffle
Sunday, October 23, 2005
Blog Party # 3 - The Big Game Night
I have been cooking up a storm this whole weekend and I hope I am not too late for this month's Blog Party with our lovely host, Stephanie from Dispensing Happiness. I missed the second edition but I am determined not to be left out from the third one. This month's party is all about the Big Game (yeah!) which is such a great theme.
One thing Splashie Boy and I love is Formula One Racing and every race weekend, you see both of us right smack in front of the telly looking at all those whizzing cars. This year, we started watching the races with a group of friends at a restaurant cum bar which has a big screen television and it is such great fun. Sadly the race season has ended last weekend but the great thing is Renault won the Constructors' Championship and Fernando Alonso was crowned this year's World Champion. It was a close race with Mclaren Mercedes but they triumphed over them at the end.

In honour of the World Champion who is from

The first tapas dish was this yummy Slow-Cooked Tomato Squid that smelt so great with tender squid. It is pretty easy to make and just involved simmering the squid hoods for thirty minutes in a fragrant tomato sauce. I used some lovely paprika that a friend had given me from her recent trip to
Slow-Cooked Tomato Squid
1 tablespoon olive oil
1 brown onion, chopped
1 garlic clove, crushed
2 teaspoons mild paprika
1 teaspoon dried oregano
500g squid hoods, cleaned and halved lengthways
400g can of diced tomatoes
2 tablespoons dry sherry
1 tablespoons capers, rinsed
sea salt and cracked black pepper
Heat a medium sized saucepan over medium heat. Add the oil and onion and cook for 4 minutes or until the onion is soft. Add the garlic, paprika and oregano and cook for 1 minute. Cut the squid hoods into thirds and add to the pan with the tomatoes, sherry, capers (if using), salt and pepper. Reduce heat to low and cover with a tight fitting lid and cook for 30 minutes or until the squid is soft and tender.

This is essential whenever you go to a tapas bar, tortilla. This version from BBC Good Food is low fat as it omits the cream and instead of cooking it on the cooker, you bake the tortilla. The tortilla on it's own is yummy and went beautifully with the squid and it's sauces.
Tortilla Tapas
3 tablespoons olive oil
1 large onion, thinly sliced
3 medium sized potatoes, peeled and thinly sliced
2 garlic cloves, crushed
2 large red peppers, quartered and thinly sliced
6 large eggs, lightly beaten
1/2 teaspoon crushed chilli flakes
handful of parsley, chopped
Preheat oven to 180C. Heat 2 tablespoons olive oil in a pan. Tip in onion and potatoes and fry gently for 20 minutes until potatoes are tender, turning frequently, adding garlic and peppers for the last 5 minutes. Tip into large bowl, season and allow to cool for 5 minutes. Stir in the eggs, chilli flakes and parsley. Leave to sit for 5 minutes, then put a non-stick 20 cm square pan in the oven to heat up. After 5 minutes, remove from oven and brush with oil. Pour in egg mixture and return to oven. Cook for 15-20 minutes. Once cooked, remove and cool for 5 minutes. Turn out on a board and cut into squares to serve.
For drinks, as I did not have any red wine in the house to make sangrias, I made a pomegrante drink instead. Just a simple splash of juice from the packet but I added a touch of 
Thanks to Stephanie for hosting as I had great fun with the food.
The round up is online, so hop over to Stephanie's at Dispensing Happiness to view those yummy snacks and drinks.
Saturday, October 22, 2005
Weekend Cat Blogging (WCB) 20
It is going to be a busy weekend with food events but one must not forget the kitties. This time round (I blocked Boo the cat from stealing the keyboard!) centerstage goes to the cutie pie ginger kittens. Both of them are getting more and more alike that I am finding it hard to distinguish which is which. The only way I can tell is to reach for one of them, one will run away while the other just sits patiently for me to scoop him up in my arms.
We have been getting a lot of rain recently so I had to use my ancient old brolly from my UK days. I can't believe that brolly can last for so many years, must be good old English technology but it is getting a bit old and rusty already. I had left it opened on the car porch to let it dry. The kittens decided that it is more fun to flip it over and play on top of it.
We have been getting a lot of rain recently so I had to use my ancient old brolly from my UK days. I can't believe that brolly can last for so many years, must be good old English technology but it is getting a bit old and rusty already. I had left it opened on the car porch to let it dry. The kittens decided that it is more fun to flip it over and play on top of it.
As usual the braver one is the naughtier one and he is on top of my brolly while his timid brother looks on and wonders what he is doing?

He took a bit of break from spinning around on the brolly to stare up the brolly handle so you can see a partial of him. He is growing fast and is a great climber, you can't prevent him from running into the house anymore.

Here he is on standby pounce mode!

Do join us for WCB this weekend at Clare's eat stuff. You can leave your link with the WCB tag in her comment box. I wonder what is Kiri up to this weekend and whether he got any of that yummy roast chicken last night. If you are a doggy person, do join the waggy tails at WDB at Sweetnicks.
Friday, October 21, 2005
SHF 13 - The Dark Side
I know my blog has been suffering from a massive infusion of sugar with all those Indian sweets I covered the past few days. It is going to reach even higher as today is Sugar High Friday time so I am timing this entry as late as possible. This round is hosted by Lovescool and is all about dark chocolate. I love the Dark Side theme as it reminds me of Star Wars. (Incidentally I just met two kids who are so Star Wars crazy that they could remember all the scenes in the six episodes. Amazing stuff!)
This round I thought I will show you my two sides; the good and bad/dark side. As I was born in May, I am a true blue Gemini and depending on my mood, I can swing from being a practical and sensible gal to a crazy one who does things on a total impulse. Hence when it came to making my entry for this month's SHF, I was all sensible about things telling myself that it has to be simple as I have too many events stacked up near each other. After doing my "good side" dessert, I switched to Lovescool's write-up to double check something and read the last paragraph where she challenged us to think outside of the box to create an unusual dark chocolate dessert. Somehow those words clicked my "dark side" on which took over sensible old me. My impulsive nature said, "Hey, I can make another dessert" while ignoring the "good side" that kept saying, "Just get on with your IMBB souffle! as time is of the essence."
Here you have my "good side" dessert, an easy yummylicious but elegant Hot Chocolate Fondant. Recently I am massively into Gordon Ramsay ever since I found an old issue of Olive magazine that had a free DVD of him cooking up items from his book, Gordon Ramsay Makes It Easy. As we don't get any of his cooking shows or the reality television show, Hell's Kitchen, I have not seen him in action before and was impressed when I saw him at work in the DVD.
Although I have not gotten his book, I had some of the book's recipes when BBC Good Food did a feature on it. The fantastic thing about this recipe is it's simplicity and most importantly, it turned out perfect when I made it after one try. The only slight bit was I got my fondant at the wrong side when I took the pictures, the recipe did ask for it to be turned over so it shows the bottom bit. The top bit looks better as it is all smooth and nice which is what I should have used. Never mind, those are minor details as one bite into that fondant was heavenly and I could not care less what it looked like from whichever angle. Do try them as they are great little desserts for entertaining and I can imagine your guests going "WOW!" when they dig into it and get that sublime river of melted dark chocolate.
Here you have my "good side" dessert, an easy yummylicious but elegant Hot Chocolate Fondant. Recently I am massively into Gordon Ramsay ever since I found an old issue of Olive magazine that had a free DVD of him cooking up items from his book, Gordon Ramsay Makes It Easy. As we don't get any of his cooking shows or the reality television show, Hell's Kitchen, I have not seen him in action before and was impressed when I saw him at work in the DVD.
Although I have not gotten his book, I had some of the book's recipes when BBC Good Food did a feature on it. The fantastic thing about this recipe is it's simplicity and most importantly, it turned out perfect when I made it after one try. The only slight bit was I got my fondant at the wrong side when I took the pictures, the recipe did ask for it to be turned over so it shows the bottom bit. The top bit looks better as it is all smooth and nice which is what I should have used. Never mind, those are minor details as one bite into that fondant was heavenly and I could not care less what it looked like from whichever angle. Do try them as they are great little desserts for entertaining and I can imagine your guests going "WOW!" when they dig into it and get that sublime river of melted dark chocolate.
Hot Chocolate Fondant
50 grams unsalted butter plus extra to grease
2 tsp cocoa powder to dust
50 grams good quality bitter chocolate (minimum 70% cocoa solids), in pieces
1 egg
1 egg yolk
50 grams caster sugar
50 grams plain flour
Heat oven to 160C/fan 140C/gas 3. Butter two large ramekins, about 10 cm in diameter, then dust liberally with cocoa powder. Slowly melt the chocolate and butter in a small bowl over a pan of hot water, then remove from the heat and stir until smooth. Leave to cool for 10 minutes.
Using an electric whisk, whisk the whole egg, egg yolk and sugar together until it is pale and thick and holds a trail, then fold in the chocolate mixture. Sift the flour over the mixture and gently fold in, using a large metal spoon. Divide between the ramekins and bake for 12 minutes until set with the slightest wobble in the middle. Turn the fondants out onto warmed plates and serve immediately.
So what did I make for my "bad/dark side"? Before I made the fondant, I was toying with the idea of making some chocolate salted pretzels that Jill Dupleix had featured in one of my Delicious magazine issues. They sounded delish as I love pretzels and covering them with chocolate sounded so divine. My implusive nature said, pretzels sound quite boring, why don't I coat those Indian snacks called muruku instead? I so wanted to do that but when I decided to make them, there weren't any at the supermarket. Then I thought, hey how about some wasabi potato crisps coated with chocolate, that will be a real clash of flavours!
Sadly there was also none at the supermarket but I did find some unusual crackers shaped like edamame beans which I bought. They tasted pretty good before and after I coated them with chocolate. I also made some with Frito Lay's Ruffled Potato Crisps which turned out pretty great too. Kinda reminds me of the Royce Chocolate Coated Potato Chips which I had before but I did not coat the whole side and I used dark chocolate instead of milk chocolate. It's pretty simple to make them but the only problem would be preventing them from melting in our tropical heat.
Chocolate Salted Pretzels (Makes 60)
100g good quality dark chocolate, grated (minimum 70% cocoa solids)
60 mini salted pretzels (You can use potato crisps)
Place the grated chocolate in a heatproof bowl. Half fill a small pan with boiling water, set the chocolate bowl over the pan (off the heat and make sure the bowl does not touch the water) and stir gently and continually until melted. The trick is to keep the chocolate's temperature from rising above 34C so it does not lose it's "temper" or gloss. You may need to replace the boiling water in the pan halfway through when you are coating the pretzels/crisps to keep the chocolate warm and runny.
Set out two baking trays covered with baking paper. Dip each pretzel/crisp into the chocolate, tap against the side of the bowl to get rid of any excess and lay on the baking trays. You can use bamboo skewers to do this delicate operation. Leave for twenty minutes, the transfer the finished pretzels/crisps to a fresh baking paper, leaving the excess chocolate behind. Transfer first batch after twenty minutes and set aside for 3 hours for it to set, then store in airtight container for 2-3 days. Do not refrigerate. (In tropical countries like ours, you will need to put them in the fridge as they will not set otherwise)

Tagged by Technorati: SHF 13
Deepavali - Little India, Klang (Part 3)
I was getting a bit tired after my walkabout around the bustling street so I took a look at some of the teatime snacks they had to offer at the stalls. They seem to be selling three kinds of items namely two types of vadai and pakora.
Vadai is quite a popular Indian snack here and you get small stalls opening during the afternoon which just sell them. The South Indians eat them with sambar and coconut chutney. I like them plain and piping hot. This is paruppu vadai which is made from ungrinded dhals (lentils) and it is crunchy and hard. You can see the bits of spice and curry leaves peeking out from the vadai.
This type of vadai is extremely popular in Malaysia and you see them at almost all the Indian restaurants or stalls. It is made from grinded black gram dhal (lentil), flour, rice flour, onions, curry powder, shredded curry leaves and chopped green chillies. I prefer this type as it is softer.
This stall was also frying up freshly made pakoras in large wok of oil.
Here you have the pakoras all ready for the customers. Not too sure what is their fillings but I can see bits of green peeking out so they could be vegetables or curry leaves. I was tempted to get some as I have not tried them before but since I had bought vadai, I thought that was more than enough for a snack.
I was feeling a bit thirsty too so I stopped by for some cendul at this little stall in a side lane. (It is next to the huge muruku stall) The cendul was very refreshing and a great booster for me to carry on walking the main street for more sweets.
I finally got to the mithai (Indian for sweets) shop, Chennai Masaala which I had heard quite a bit about from reading the papers. The sweets are flown in weekly from Chennai and it slightly different from the ones you usually get at the Indian restaurants. The only bummer was the way their glass display cabinet was done, there was no way I could take pictures without the glass. This caused a slight reflection for my photos so some are not perfect.
These discs are called white pistachio peda. Peda is a sweet that is made from khoa which is milk that has been boiled until it seperates into a solid chunk and liquid. The solid part is used to make the sweet and slivers of pistachio(known as Pista in Indian) is placed on top of them as a decoration.

This stacked squares are Kaju Dry Fruit is made from ground nuts and is studded with niblets of cashew nuts and pieces of dry fruits.
There are a few types of Kaju (Indian for cashewnut) sweets made from ground nuts and this one is called Kaju Melon as it looks like a watermelon with the red and green colours. Silver foil is added also as the outer layer which makes it quite festive. It is made from ground cashewnuts and almonds.
Another festive looking sweet, this is known as Badam (Indian for almond) Roll which is made from ground almonds. Silver foil is added to each roll as it is more of a celebratory sweet.
Don't they look like real life apples? This is known as Kaju Apple and is made from ground pistachios and cashew nuts. Their little stems are pistachio bits and they are painted yellow and orange to look like the real thing.
This is known as Kaju Flower as they have been cut to look like a flower from the top. It uses the same ingredients such as ground pistachios and cashewnuts as the Kaju Melon (which is a cut up version of the Kaju Flower).
These colourful rounds are known as Kaju Four in One as four colours are added and consists of ground cashewnuts and almonds.
Then you have the many varieties of ladoos, this one is called Bombay Ladoo as it has saffron to give it a yellow tinge.
These look similar but they are known as Boondhi Ladoo which is made from sugee (semolina) flour.
Then this is Spice Ladoo which is flavoured with spices like cloves.
They also have a wide selection of halwas made from brown sugar and cashewnuts.
A very unusual way of flavouring barfi, the milk sweet, these ones are mango barfi. According to the shop owner, the milk is from a cow after it has given birth.
This is plain milk barfi which has flecks of pistachios decorating their tops.
These ones are chocolate barfis with silver leaf decorating their tops.

Something unusual, this is date mysore and you can see the bits of dates and nuts in them.
Another mysore but this one is plain ghee.
This is SPL Cow Peda which is made purely from cow milk.
These tri-coloured squares are called Sangam Barfi which have three types of nuts; cashew nuts, almonds and pistachios.

Hope you enjoyed my jaunt to Little India in Klang. Sorry about the short descriptions for the sweets but there does not seem to be much written about some of them in the Internet. I will probably do more posts on the other places celebrating Deepavali as there are lots more places like Brickfields (which I have been) and Masjid India that are booming with Deepavali shoppers.
Thursday, October 20, 2005
Deepavali - Little India, Klang (Part 2)
On to the second part of my walkabout in Little India, Klang.
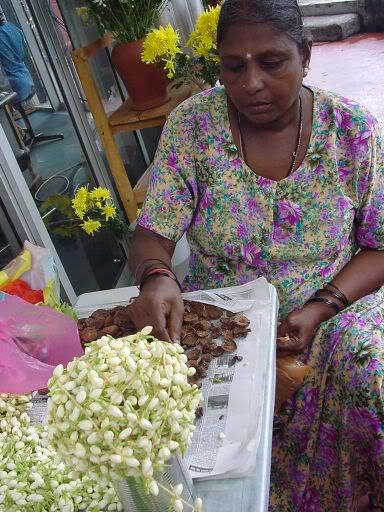
When you walk down the streets, not only do you find splashes of colours with the saris hung all over the place, you will also smell the fragrance of fresh jasmine. Flowers are said to play a huge role with the Indians as a symbol of prosperity. Hence it is not surprising to find these ladies all along the street weaving white jasmine flowers into garlands using threads. The jasmine flower is said to symbolise happiness. I love their delicate fragrance especially on hot summer nights.
Another place you see fresh flower stands are in front of Indian temples as flowers are offered to the Indian deities especially on Tuesdays and Fridays, the Hindu holy days. These white jasmine garlands can also be worn by women in their hair to symbolise purity and beauty or to complement their colourful saris. Besides selling garlands, these ladies also trade in betel nuts and leaves. The betel nuts (seen below) is chopped finely or coarsely and mixed with lime paste and spices. This mixture is then placed on top of fresh betel leaves and popped in your mouth and chewed. Eating betel nuts this way is said to help your digestive system.
During this festival, sweets play a major role and traditionally familes will prepare them days just before Deepavali so they are fresh. However, you can also get a wide selection of sweets at the stalls and some of them are available all year round. It is believed that sweets should be exchanged between family and friends during the festival as it brings good luck.
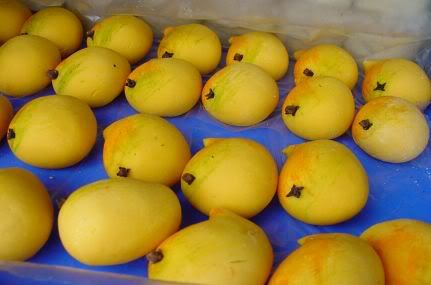
This little stall had a wide selection of sweets including these yellow coloured ones with cloves as stems. You see quite a few of these around Little India and they come in different shapes and colours. There was even one shaped like a banana. Not too sure what the taste of this is like as I did buy one but I have yet to try them. I suspect they will be milk based and may have nuts inside.
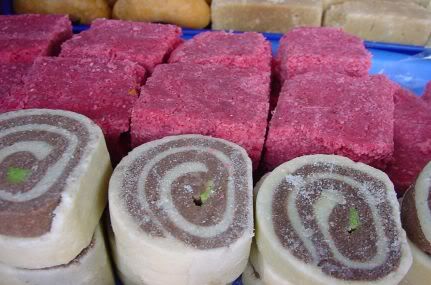
The pinwheel sweets are something unusual that I have yet to see around while the bright pink ones are made from ghee and have a melt in the mouth quality.
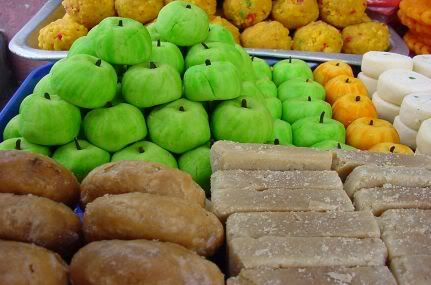
The streets seem to be full of these apple shaped sweets that come in different colours which are so pretty. I believe they are the same as the yellow sweets and will have different nuts inside them.
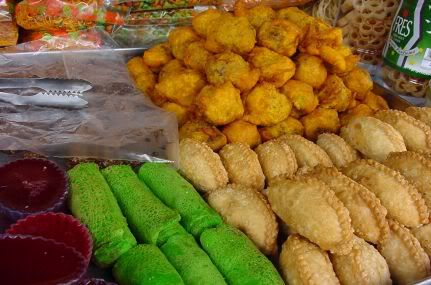
This stall was also selling savoury snacks like curry puffs stuffed with vegetarian fillings, sweet jellies and even the Malay kuih dadar which has grated coconut flavoured with gula melaka (Malay for palm sugar).
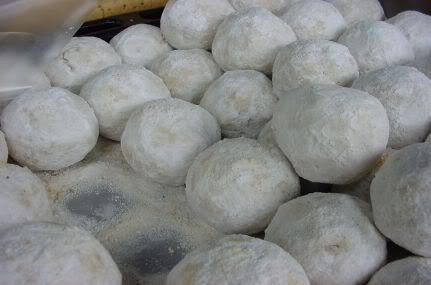
I have blogged about these earlier but I love them. Known as ghee balls, they don't look much among all their colourful cousins but they melt in your mouth with their nutty flavour. The amazing thing is this type of sweet has similar cousins all over the world whether it is known as mexican wedding cookies to the Americans or kuih makmur to the Malays.
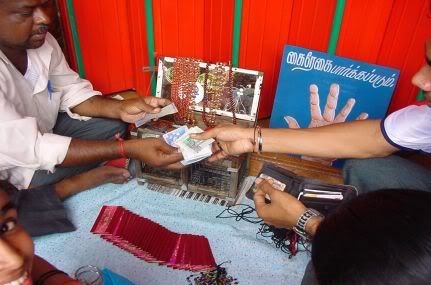
Hope you are not suffering from the sweet overdose? If you are, take a break as the fortune teller beckons. Here you see someone asking the teller what will this year's Deepavali hold for him. Those reddish cards will be randomly picked by a bird in the wooden cage and the fortune teller will interpret them for a fee.
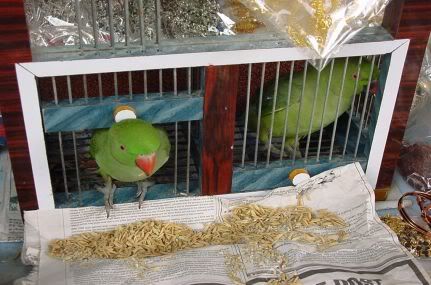
Here is a close up of the fortune telling birdies in their cage as one of them is taking a well deserved tea time break. I am not sure what kind of birds they are but they look pretty tame and well cared for.
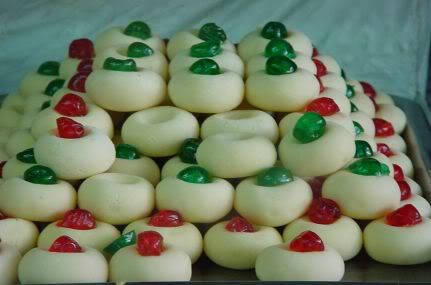
Back to my sweets trail....I have seen the pictures of these sweets on someone's website hence I was keen to check them out myself. Most of these sweets are usually placed behind glass cabinets to keep out the dust in the Indian restaurants. I had some slight problems taking the pictures with the glass reflection. One of the workers of this Restaurant Mohana was so nice as he saw me struggling with my picture taking that he opened them for me so I could take better ones. Not only that, he patiently let me ask him what each sweet was. Unfortunately he could not converse much in English or Malay but we had a list of the sweets pasted on the side of the cabinet so he could point to me which ones they were. These are known as Vanilla Burfi that is made from milk. They had added red and green maraschino cherries on top of them to give them quite a festive look.
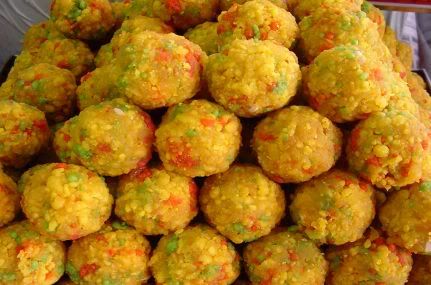
This is laddu made from gram (lentil) flour, rice flour, ghee and sugar. It is a pretty popular item as I saw this at almost all the stalls around Little India.
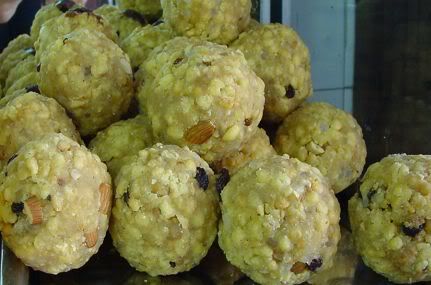
They also had these special laddus which were bigger than the normal laddus and chockful of almonds.
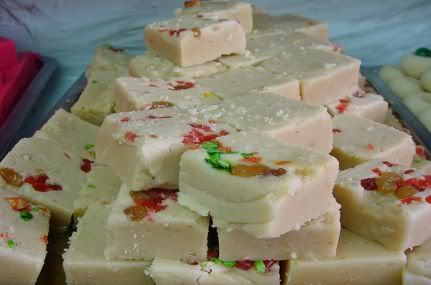
The shop had a wide selection of burfi that came with different fruits, these ones had red and green bits of cherries and a sprinkle of raisins on top of them.
These are mysore pagu, a South Indian sweet made from ghee, chickpeas flour, grated coconut, kesari powder and cashewnuts which is flavoured with cardamon. The kesari powder is also known as saffron powder which gives this sweet it's yellow colour.
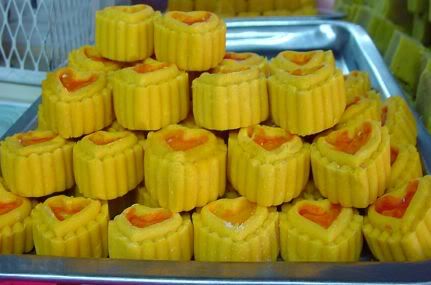
According to the restaurant, these heart shaped sweets are known as apple govas. Not too sure what it is made of but I reckon it is similar to paal gova, a milk based sweet and these ones could be flavoured with apples. If any of you know more about this sweet, do drop me a comment as I would love to know more about it.
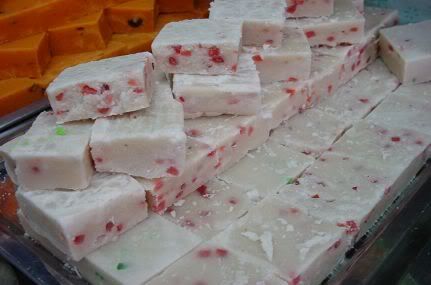
More varieties of the fruit burfi, these ones have red cherry bits inside them.
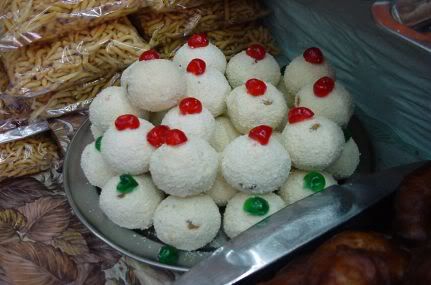
These were tucked in a corner and look quite similar to the vanilla burfi with their red and green maraschino cherries tops. They are known as rava laddu and is made from ghee, roasted semolina(rava), fresh coconut, cardamoms and nuts. These laddus are tossed in some dessicated coconut making them look a bit Christmassy.
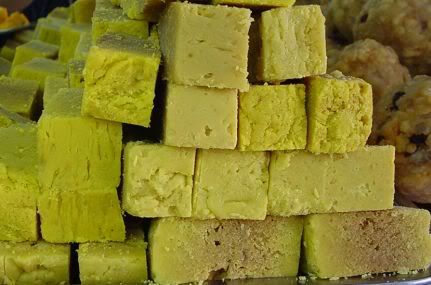
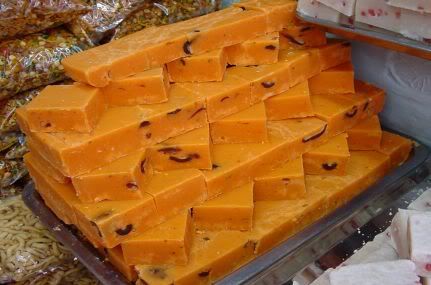
Not too sure what is inside this fruit burfi but they look pretty unusual with their deep orange pumpkin colours and I think there are nuts inside too.
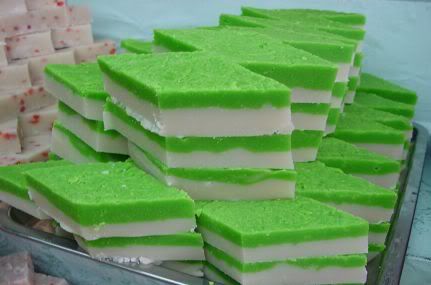
This is another burfi sweet that has bright green and white layers making it look a bit like a kuih talam.
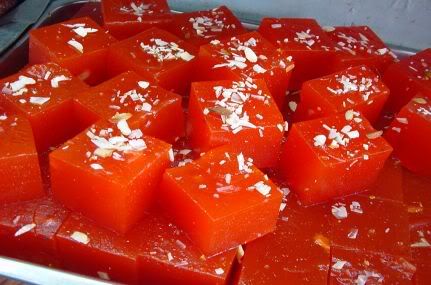
I love these brilliant orange halwas with their chopped nut topping. They are made from a mixture of lime juice, corn flour, ghee and sugar.
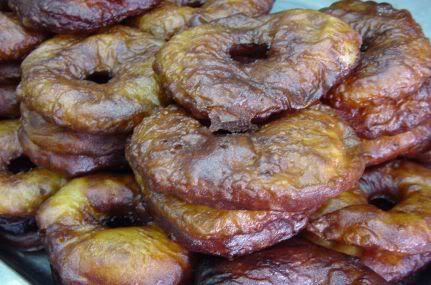
These brown like doughnuts are known as Athirasam, a Southern Indian favourite. It is made from rice grains that is soaked and then grinded into a fine powder. You then make a candy like substance called paagu from a type of raw sugar called jaggery, by slowly boiling it with water. Then you mix in cardamom for flavour and mix in the powdered rice. The dough is left to stand overnight and then deep fried in shape of discs.
Tomorrow will be another tooth aching day as it is the last instalment of my Little India tour where I feature sweets flown in from Chennai. I also have this month's Sugar High Friday entry that is all about the alluring and enticing dark chocolate. With regards to today's sweets, if I got any of their names or descriptions wrong, do tell me as I pieced them together from my discussions with the shop and whatever I could find from the Internet.
During this festival, sweets play a major role and traditionally familes will prepare them days just before Deepavali so they are fresh. However, you can also get a wide selection of sweets at the stalls and some of them are available all year round. It is believed that sweets should be exchanged between family and friends during the festival as it brings good luck.
This little stall had a wide selection of sweets including these yellow coloured ones with cloves as stems. You see quite a few of these around Little India and they come in different shapes and colours. There was even one shaped like a banana. Not too sure what the taste of this is like as I did buy one but I have yet to try them. I suspect they will be milk based and may have nuts inside.
The pinwheel sweets are something unusual that I have yet to see around while the bright pink ones are made from ghee and have a melt in the mouth quality.
The streets seem to be full of these apple shaped sweets that come in different colours which are so pretty. I believe they are the same as the yellow sweets and will have different nuts inside them.
This stall was also selling savoury snacks like curry puffs stuffed with vegetarian fillings, sweet jellies and even the Malay kuih dadar which has grated coconut flavoured with gula melaka (Malay for palm sugar).
I have blogged about these earlier but I love them. Known as ghee balls, they don't look much among all their colourful cousins but they melt in your mouth with their nutty flavour. The amazing thing is this type of sweet has similar cousins all over the world whether it is known as mexican wedding cookies to the Americans or kuih makmur to the Malays.
Hope you are not suffering from the sweet overdose? If you are, take a break as the fortune teller beckons. Here you see someone asking the teller what will this year's Deepavali hold for him. Those reddish cards will be randomly picked by a bird in the wooden cage and the fortune teller will interpret them for a fee.
Here is a close up of the fortune telling birdies in their cage as one of them is taking a well deserved tea time break. I am not sure what kind of birds they are but they look pretty tame and well cared for.
Back to my sweets trail....I have seen the pictures of these sweets on someone's website hence I was keen to check them out myself. Most of these sweets are usually placed behind glass cabinets to keep out the dust in the Indian restaurants. I had some slight problems taking the pictures with the glass reflection. One of the workers of this Restaurant Mohana was so nice as he saw me struggling with my picture taking that he opened them for me so I could take better ones. Not only that, he patiently let me ask him what each sweet was. Unfortunately he could not converse much in English or Malay but we had a list of the sweets pasted on the side of the cabinet so he could point to me which ones they were. These are known as Vanilla Burfi that is made from milk. They had added red and green maraschino cherries on top of them to give them quite a festive look.
This is laddu made from gram (lentil) flour, rice flour, ghee and sugar. It is a pretty popular item as I saw this at almost all the stalls around Little India.
They also had these special laddus which were bigger than the normal laddus and chockful of almonds.
The shop had a wide selection of burfi that came with different fruits, these ones had red and green bits of cherries and a sprinkle of raisins on top of them.
These are mysore pagu, a South Indian sweet made from ghee, chickpeas flour, grated coconut, kesari powder and cashewnuts which is flavoured with cardamon. The kesari powder is also known as saffron powder which gives this sweet it's yellow colour.
According to the restaurant, these heart shaped sweets are known as apple govas. Not too sure what it is made of but I reckon it is similar to paal gova, a milk based sweet and these ones could be flavoured with apples. If any of you know more about this sweet, do drop me a comment as I would love to know more about it.
More varieties of the fruit burfi, these ones have red cherry bits inside them.
These were tucked in a corner and look quite similar to the vanilla burfi with their red and green maraschino cherries tops. They are known as rava laddu and is made from ghee, roasted semolina(rava), fresh coconut, cardamoms and nuts. These laddus are tossed in some dessicated coconut making them look a bit Christmassy.
Not too sure what is inside this fruit burfi but they look pretty unusual with their deep orange pumpkin colours and I think there are nuts inside too.
This is another burfi sweet that has bright green and white layers making it look a bit like a kuih talam.
I love these brilliant orange halwas with their chopped nut topping. They are made from a mixture of lime juice, corn flour, ghee and sugar.
These brown like doughnuts are known as Athirasam, a Southern Indian favourite. It is made from rice grains that is soaked and then grinded into a fine powder. You then make a candy like substance called paagu from a type of raw sugar called jaggery, by slowly boiling it with water. Then you mix in cardamom for flavour and mix in the powdered rice. The dough is left to stand overnight and then deep fried in shape of discs.
Tomorrow will be another tooth aching day as it is the last instalment of my Little India tour where I feature sweets flown in from Chennai. I also have this month's Sugar High Friday entry that is all about the alluring and enticing dark chocolate. With regards to today's sweets, if I got any of their names or descriptions wrong, do tell me as I pieced them together from my discussions with the shop and whatever I could find from the Internet.
Subscribe to:
Posts (Atom)
