Pages

Monday, May 30, 2005

ShAnGhAi NooN

Recently Kuala Lumpur has been invaded by Shanghai food with many new restaurants cropping up such as Shanghai at the Marriott Hotel, Xin Shanghai at Jalan Sultan Ismail, Dragon I in Cititel Hotel and Chef Loong in Petaling Jaya. The latest one to join this illustrious lot is Crystal Jade La Mian Xiao Long Bao which opened its doors in Kuala Lumpur on 16 May, 2005 at Lot 10, Kuala Lumpur.

Already established in Singapore where they have numerous restaurants that serve a large variety of Chinese food, this marks Crystal Jade's first foray in Malaysia. My mother who has tasted their food in Singapore was enthusiatic when she heard they had opened a branch here so we went recently to sample the food for lunch and we were not dissapointed.

The restaurant has an open kitchen so we could peek in to see the chefs cook and make the famous la mian (Chinese for hand pulled noodles). Once we put in our order for a bowl, the chef started making our noodles, here he is tossing the noodles at quick speed that my camera can't even catch it!

Image hosted by Photobucket.com

You need to toss and knead the dough to get the right consistency for the noodles. The chef is using the palms of his hands. He will fold the dough to get it ready to be pulled again.

Image hosted by Photobucket.com

Here he is cutting the dough to be pulled again.
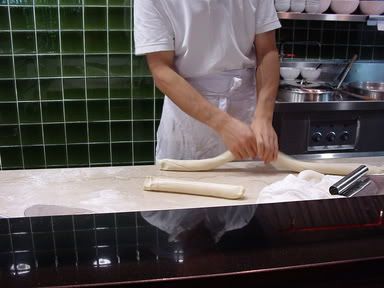
Image hosted by Photobucket.com

Then he starts pulling the dough at great speed again and after a while, thin strands of noodles appear which he will put in boiling water to cook.
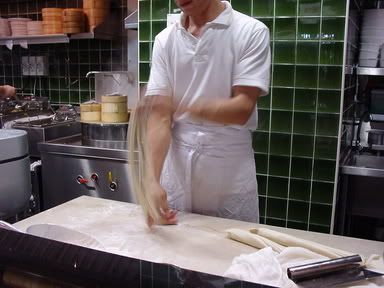
Image hosted by Photobucket.com

I was too slow to get the final bit where he came out with the noodle strands, in fact he surprised me as next thing I knew, after pulling it, the noodles just appeared from no where. Our bowl of piping hot la mian came plain and with a delicious soup. My bowl was still steaming hence you see the fuzziness in the picture as I quickly snapped it immediately after it was served.
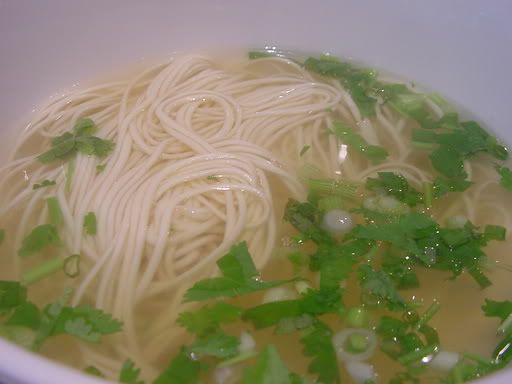
Image hosted by Photobucket.com

This is the Nanjing salted duck which was tender and flavorsome, just nice to accompany our plain la mian. Although it's soaked in brine water which helps it achieve the tenderness, it's not salty. It's a signature dish in Nanjing that has almost 400 years of history.
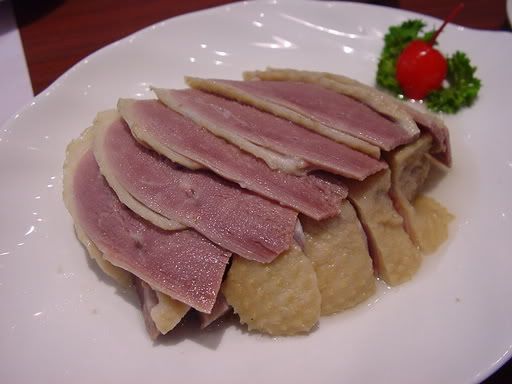
Image hosted by Photobucket.com

This is the famous Xiao Long Bao which is a meat filled steamed bun with hot soup inside. See the little hole on top of the steamed bun, that is for you to suck up the wonderful hot soup. The filling is so tender that it melts in your mouth!
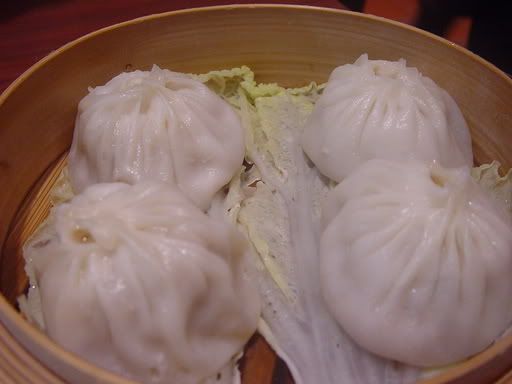
Image hosted by Photobucket.com

This is a variation of the Xiao Long Bao called Shanghai Pan Fried Bun as it's pan fried instead of steamed. We flipped one over, so you can all see the golden edges from pan frying it.
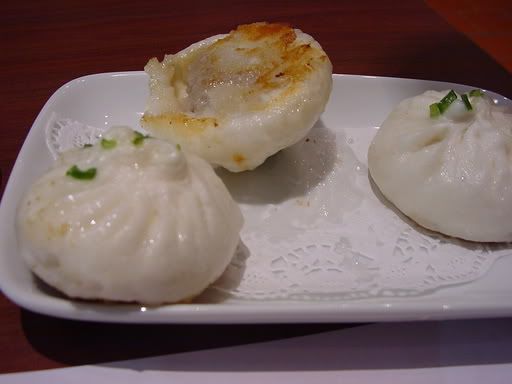
Image hosted by Photobucket.com

This is the ultimate cream puff, the souffle egg white ball with mashed red bean and banana dusted with icing sugar. It's so light and airy as it's made from egg whites and the filling is quite an unusual combination of red bean and banana. I never knew those two flavours went together until I tried it. If you order this dish, it comes first as the filling is piping hot so they let it cool during the meal just in time for dessert.
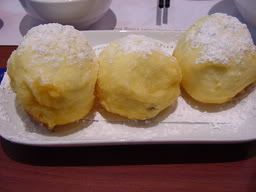
Image hosted by Photobucket.com

Crystal Jade La Mian Xiao Long Bao
R2 Annexe Block
Lot 10 Shopping Centre
50 Jalan Sultan Ismail
50250 Kuala Lumpur
Tel: 03-2148 2338
(Non-Halal)

*Disclaimer: The opinions expressed here is entirely based on my personal tastebuds and may vary for others. The reviewer declares that she has not received any monetary or non-monetary compensation for writing this review.
RaViShInG rAvIoLi

I have a soft spot for filled pastas and I will never resist a chance to try them. Recently Isetan supermarket in KLCC had a promotion that allows you to purchase filled pasta. The pasta are air flown from Italy and are usually distributed to restaurants in Malaysia. Splashie Boy bought a few varieties for us to try on Saturday night.

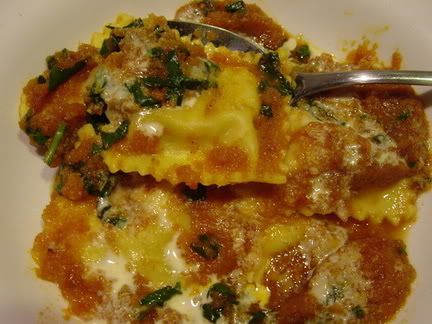
The first one we tried was the lobster and crab meat ravioli which we had with fresh tomato sauce, some cream and shredded basil. The filling was sweet and tasty but my sauce was a bit overpowering.

Image hosted by Photobucket.com

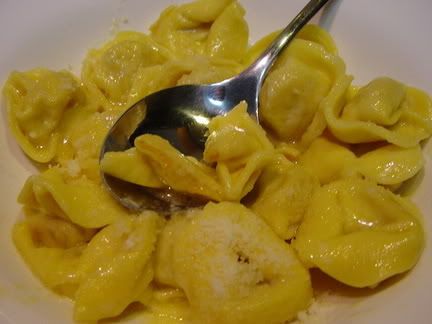
Since the tomato sauce was too strong for the ravioli, I decided to try a lighter sauce and made parmesan butter sauce for the pumpkin tortellini. Extremely simple recipe which just entailed melting butter in a pan, tossing the cooked pasta, freshly grated parmesan cheese and some water from boiling the pasta. Serve with more freshly grated parmesan cheese. The sauce went perfectly with the pasta. However, there was little pumpkin taste in the pasta.

Image hosted by Photobucket.com

We still have one more variety to try, a truffle stuffed pasta so I hope that will taste nice. I must admit that I was not wholly impressed with the taste of the pasta although the lobster one was quite nice. If you're mad about filled pasta like me, I recommend Fasta Pasta at Ikano Power Centre which has a few ravioli dishes. They even have a vegetarian one with avocado and portions are huge. The California Pizza Kitchen in KLCC does an upmarket ravioli with Portobello Mushrooms as a stuffing and a cream sauce. Toscana's in Desa Sri Hartamas does huge ones with a creamy mushroom sauce and a salad topping so you don't find it too rich.

Saturday, May 28, 2005

KyUrI CuCuMbEr

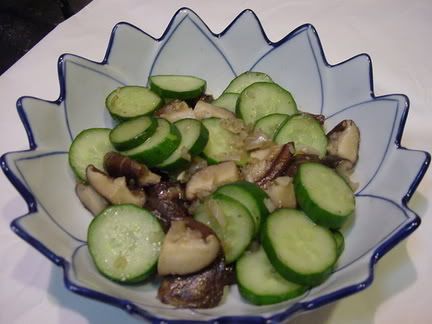
I love the coolness and crunchiness of cucumbers and one of my favourites is the Kyuri or the Japanese cucumber. I find the local cucumber a bit bland and some have a bitter aftertaste. It's totally distinct from the local cucumber with it's dark green skin and it is curved and skinny compared to the fatter local pale green cucumbers. The kyuri makes a wonderful healthy snack as you can eat it raw (no bitterness). Besides eating them crudite style, the Japanese mainly use kyuri to make vinegared dishes as an appetizer in their meal or pickles due to it's crunchy nature.

If I am not eating them raw, I like to stir fry them with fresh shitake mushrooms or sliced fish cake if they are available in my fridge. This softens the kyuri a bit but there is still a crunch to it. For the dish below, the minced garlic is fried till fragrant, then add the chopped fresh shitake mushrooms and kyuri to stir fry. The mixture is then left to simmer in a splash of water, some oyster sauce and soya sauce to taste. Usually I use 10-15 minutes but check on how cooked is the kyuri and the mushrooms as you may prefer it to be softer or crunchier. Dish up and enjoy.

Image hosted by Photobucket.com

Thursday, May 26, 2005

PoRRiDgE

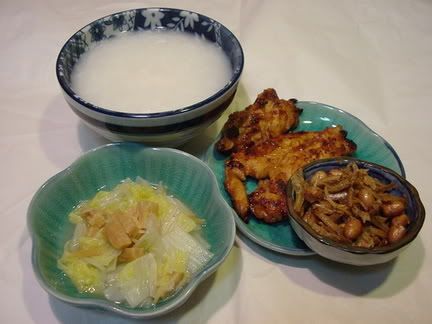
We recently had Teochew porridge with some dishes for dinner. I must admit that although I do eat porridge occasionally, I have never cooked it before at home. I got the inspiration to have Teochew porridge when I received some yummy deep fried ikan bilis (Malay for anchovies) and peanuts that my aunt made. (See the small little plate of them in the picture) They go perfectly with the plain and watery rice gruel.

The Teochews are famous for their porridge which they can eat throughout the day with a variety of salty accompaniments like kiam chai (salted vegetables), chai por (preserved radish), boiled salted duck eggs, fried salted fish and fried peanuts. They also eat porridge with braised duck (lou ark). The gravy from the braised duck is also used to cook fried bean curd (tau kua) and hard boiled eggs that all go perfectly with the porridge.

I tried to ask my mum how to cook the porridge but she said that it is all based on estimation so I tossed some rice grains in a pot, added some water and boiled it. After it has boiled, I stirred it and left it to simmer. I stirred the pot occasionally to ensure the mixture did not catch at the bottom of the pan and slowly the porridge got cooked. Once the rice grains had formed and softened, I turned the fire off.

Besides the fried ikan bilis and peanuts, we also had pan fried chicken fillets with a tomato sauce and Chinese cabbage with dried scallops. Not your usual fare in Teochew porridge but Splashie Boy is no great fan of salted vegetables and I did not have any salted duck eggs in the larder.

I had cut the Chinese cabbage in smaller pieces and soaked the dried scallops in boiling water. Peel and slice some garlic cloves and fry in a bit of oil. Once fragrant, put the cabbage in the wok and toss the mixture. Leave for 1-2 minutes and then add the dried scallops and their soaking liquid. Cover the wok and leave it to simmer for about 10-15 minutes. Season the vegetables to your taste with salt or soya sauce.

For the chicken fillets, marinate the chicken in a mixture of soya sauce, corn flour and a dash of pepper for about 30 minutes. Mix the seasoning with tomato ketchup, a dash of sugar, soya sauce and corn flour. Coat the chicken with the seasoning and pan fry the chicken until golden brown.

Image hosted by Photobucket.com

Tuesday, May 24, 2005

IMBB 15 - HaS my BLoG JeLLed Round Up

Elise of Simply Recipes has summarised all those wonderful entries for the IMBB 15 round-up in her website. Click here to drool over them like I did as they all look so good and enticing. I must admit that I am now itching to make some to cool down in this hot weather.
Great job organising and summarising the entries, Elise! Thanks again for a wonderful event. Hopefully this will be the first of many IMBB's I participate in.

Monday, May 23, 2005

SpLaShiE BoY's InVeNtiOn

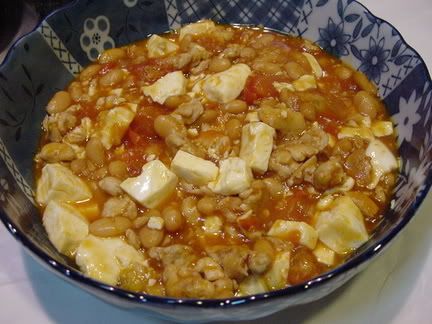
Splashie Boy and I love baked beans. I guess it makes us nostalgic for those campside dinners in the jungle with our Four Wheel Drive buddies a.k.a the Lanuns (Malay for pirates) and the Buayas (Malay for crocodiles). Originally my mum taught me how to make this simple dish from diced tomatoes, minced chicken and mashed tofu. After Splashie Boy sampled that dish, he said it would taste better with baked beans and he's right, hence I call this dish, his invention.

Baked Beans with Minced Chicken, Tomatoes and Diced Tofu
100g chicken fillets, minced
2 tomatoes, diced
Half a pack of tofu, diced
One small can of baked beans (23g), preferably low salt type
2 shallots, chopped finely
1 garlic clove, chopped finely
1 tbsp soya sauce
1 tsp corn flour
Dash of white pepper
Dash of sesame oil

Mince the chicken fillets finely. Marinate the minced chicken in soya sauce, white pepper, sesame oil and corn flour for approximately 30 minutes to 1 hour. The sesame oil helps to prevent the minced chicken from sticking to the saucepan. Chop the shallots and garlic finely.
Heat the oil, fry the shallots and garlic till fragrant. Add the minced chicken and stir fry to brown. Once browned, add the tomatoes and mix together. Put the lid on the saucepan and turn the heat to medium. Let the tomatoes soften for about 3 to 5 minutes. Add the can of baked beans and diced tofu. Stir the mixture and leave to simmer for about 3 minutes to heat through. Serve with hot rice.


Image hosted by Photobucket.com

Sunday, May 22, 2005

IMBB 15 - HaS my BLoG JeLLed?

Even before I started this blog, I have been trawling through numerous food blogs available on the Net. During one of "fishing trips", I found this blog called Is My Blog Burning? (IMBB) which is a monthly food event that involves bloggers cooking and posting recipes based on a common theme. This month's IMBB which is the fifteenth one is themed, "Has My Blog Jelled?", hosted by Elise of Simply Recipes.

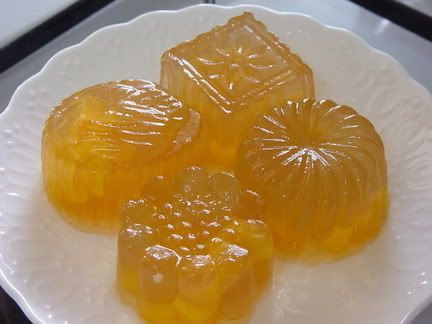
The theme looked do-able since jellies are quite simple to make and Elise said I could use konnyaku jelly powder. It was extremely nice to make the jellies as it is pretty calming to stir the pot slowly. Moreover since the weather has been hot hot hot, these cool jellies were really refreshing.

Konnyaku jelly powder is made from grinding the tuber root of the konjac plant. It is popular in Japan for making an item called devil's tongue used in oden and shirataki noodles that are found in Sukiyaki. For the Malaysians, think of oden as your Japanese Yong Tau Foo dish with the variety of fish cakes.

Konnyaku jellies were extremely popular in Malaysia a few years back as it was simple to make and was termed as healthy food. There were stalls in shopping centres selling konnyaku jellies of different flavours and women were flocking to cooking schools to learn how to make the jellies. Although the konnyaku jelly hype has died down a bit but it still remains popular in Malaysia. The original recipe actually includes the addition of citric acid as a stabliser to make the jelly more crunchy. I have omitted that in my jelly recipes as I'm not a great fan of adding chemicals to my food. Even without the citric acid, the jelly is bouncy enough for my liking.

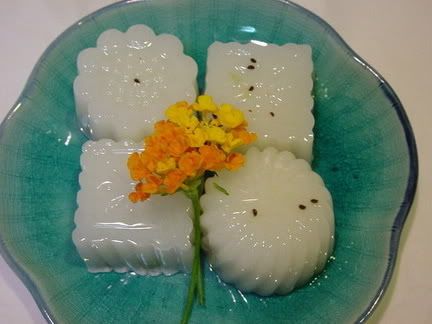
My recipes are based on a locally published cookbook called Taste of Sweet Temptations; it's chock block with jelly and agar-agar recipes. One of my all time favourites from the book is their Thai Style Coconut Konnyaku Jelly. I tend to steer away from anything that requires milk, whether coconut or evaporated so this clear jelly made from coconut water was just what I liked. Another thing I try to avoid is adding colouring to my jellies. The beauty of this jelly is it's extremely refreshing as it's made completely from young coconut water. Originally the recipe did state a combo of water and coconut water but I instead I have replaced the water portion with coconut water.

Thai Style Coconut Konnyaku Jelly
1 packet (12g) konnyaku powder
160g sugar
1,000 ml of coconut water
1 Thai young coconut, scooped out flesh

Combine konnyaku powder, sugar and mix well. Ensure you blend the two together well or else you will get lumps in your mixture. Bring coconut water to boil in a saucepan. Add in the combined konnyaku powder and sugar, cook at low heat till boiling and sugar has dissolved. You will need to stir the mixture constantly and watch the pot to ensure no overboiling. Once it has boiled, remove from the heat. Pour the mixture into mould, sprinkle coconut flesh into the mixture and leave to cool. Chill in the fridge till set.

Image hosted by Photobucket.com

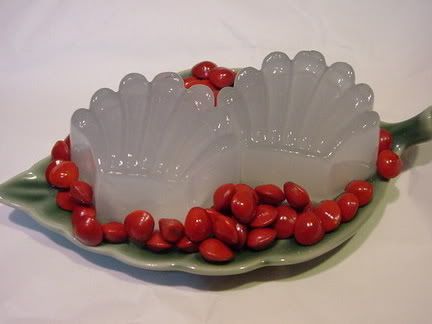
My two coconut jellies did look a bit white and plain on top of my leafy plate, so I added some red saga seeds as a decoration. The seeds are inedible and usually collected as they are called "love beads" by some romantics.

After making the coconut jelly, I was in a total "jelled up mode" and came out with this new concoction of mine. It's made from Justea, a canned green tea drink which is popular in Malaysia. As I added pieces of canned peaches in the jelly, I chose the peach flavoured green tea. The recipe is based on the coconut jelly.

Justea Green Tea with Peach Konnyaku Jelly
1 packet(12g) konnyaku powder
100g sugar
950ml Justea Green Tea with Peach
Canned peaches cut up in cubes

Drain the canned peaches from their syrup. Dice them into small cubes, place them in the jelly moulds. Combine the konnyaku powder, sugar and mix well. Bring the Justea Green Tea with peach to boil in a saucepan. Add in the combined konnyaku powder and sugar, cook at low heat till boiling and the sugar has dissolved. Remove from heat.

Pour mixture to fill up 1/3 of the jelly moulds. Wait a few minutes then top up with 1/3 more of the mixture for the moulds until it reaches the top. This helps to keep the fruit at the bottom of the jelly. Leave to cool and chill in the fridge till set.

My peach bits did not really stick to the bottom of the jellies as I poured them out a bit fast. Instead they hovered around the middle bit and if you see the picture, you can see bits of orange within the light brown jellies. The peach flavour and smell is quite strong from the Justea so it's actually quite aromatic and does not need any additional flavouring.


Image hosted by Photobucket.com

To round up my trio of jellies, I went back to my cookbook and they had a Kiwi Konnyaku Jelly which I had yet to try. They did not specify what kind of yoghurt used so I chose a low fat kiwi flavoured one to keep the sugar levels down. Surprisingly there is no taste of yoghurt in the jelly. This jelly was a bit tart though with the kiwifruits inside ( I think my kiwifruits weren't so sweet even though they had ripen).

Kiwi Konnyaku Jelly
1 packet (12g) konnyaku jelly powder
1 cup (150g) natural yoghurt
200g sugar
950ml water
1 kiwi fruit, peeled and cut into small cubes

Put the konnyaku jelly powder, yoghurt, sugar and water into a small pot. Stir and bring to boil until ingredients have dissolved. Add in the kiwi fruit cubes and use low heat to boil for another 5 minutes. Pour mixture into mould and leave to set. Chill in the fridge before serving.


Image hosted by Photobucket.com
Thanks Elise for hosting IMBB 15, I had so much fun making these jellies. In fact, I forgot how fun it is that I will be adding them to my list of things to experiment. My taste teams suggested that the next round should be based on popular drinks in Malaysia; soya bean milk with cubes of cincau (glass jellies), rose syrup jellies with kiwi seeds and etc.

Saturday, May 21, 2005

FeAsT

Recently we had a "makan" (malay for eat) session with my family as one of my cousins came back from Australia. It was held at Sam You (Chinese for three friends) restaurant in Petaling Jaya New Town. The restaurant is extremely popular for it's value for money Chinese food and has three other branches in Petaling Jaya and Seri Kembangan.

Traditionally, a Chinese banquet has eight courses which is served one by one (this one had nine courses as dessert was two courses). The rice or noodles dish is usually served at the end. If it's a birthday dinner, there will be noodles as it signifies long life for the birthday gal/guy. These dinners are quite popular at restaurants as they come in sets with a fixed price which is cheaper than you ordering each dish piece meal. That night we had the dinner, the place was packed with people. There was a few birthday dinners as they sang birthday songs, cut the cake (one even served durian cake as we could smell it!) and the traditional red eggs. The
red eggs is meant to symbolise good luck and roundness.

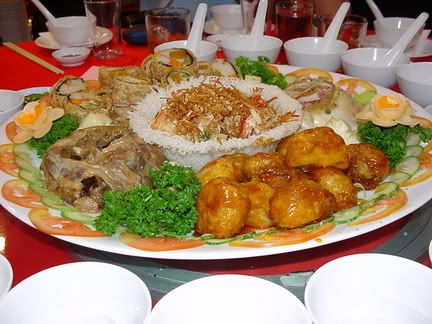
You usually start off with an appetiser platter which is like your Italian antipasti where they serve a variety of small dishes. The rolls at the back are quite similar to the futomaki rolls you get in Japanese restaurants as it is bound with seaweed. However, futomaki has rice as a filling while this roll had fish paste,
otak-otak, celery and a crab stick. The roll has also been coated with a batter and deep fried. The white mound next to it is the vegetarian albalone, looks like the real thing but is made from fish meat. Then you have the deep fried fish balls in a bean curd skin with a sweet and slightly sourish sauce. Next to it is the mushrooms of different varieties with baby clams wrapped in a bean skin pouch. In the middle is prawns fried with kerisik (Malay for toasted shredded coconut)

Image hosted by Photobucket.com

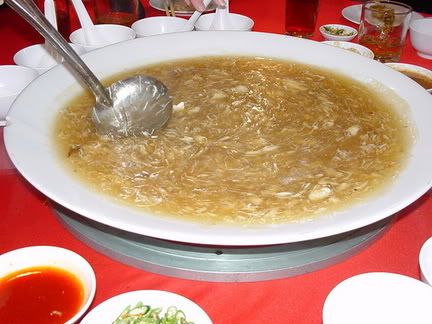
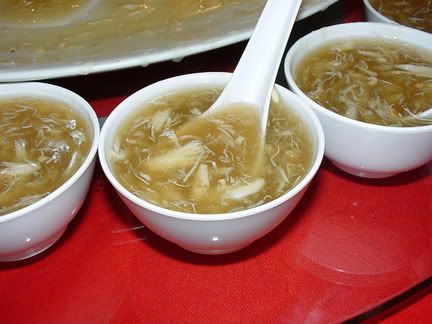
Traditionally the next dish is always the sharkfins soup. It comes in a huge bowl so it's easier to ladle to the individual bowls.

Image hosted by Photobucket.com

Besides sharkfins in the soup, there are chunks of crab meat. You can opt to take your soup with some chou (Chinese for black vinegar) or some take it with mustard to give it an extra spicy kick.

Image hosted by Photobucket.com

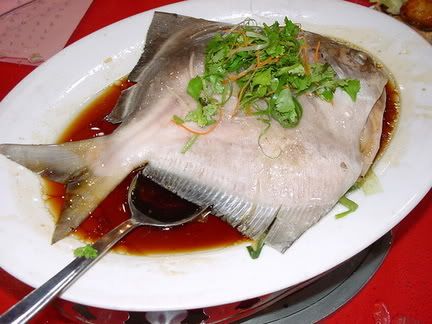
Next dish is the steamed white pomfret. The waitress will cut it up for you once it is served so you can enjoy it piece by piece depending on your preference. Some go for the middle bit as there is no bones while there are others who love to crunch and chew on the head and the fins.

Image hosted by Photobucket.com

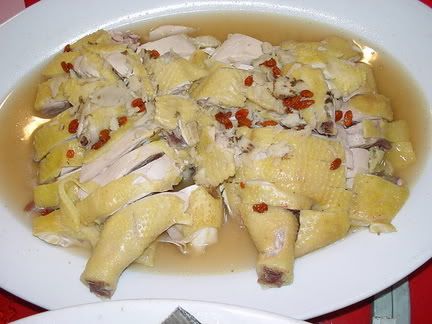
This is my cousin's favourite dish, she loves choi yuen kai (Chinese for village chicken) which is similar to the free range chicken. It is steamed with rice wine, kei chee (Chinese for
wolfberries, those red berries on top) and dong quai (Chinese for angelica). This dish is very moreish, must eat with white rice and my cousin's Aussie husband ordered one bowl for this dish.

Image hosted by Photobucket.com

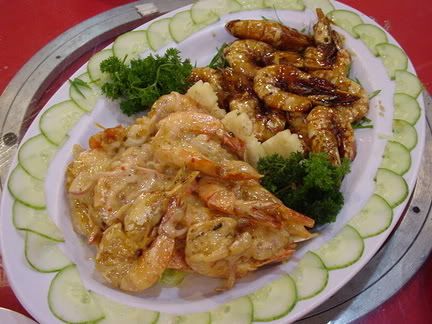
This dish is called Yin and Yang prawns, as there are two varieties served; fried with a dark soya sauce and some honey while the other one is tossed in a thousand island dressing with shreds of chillis and onions.

Image hosted by Photobucket.com

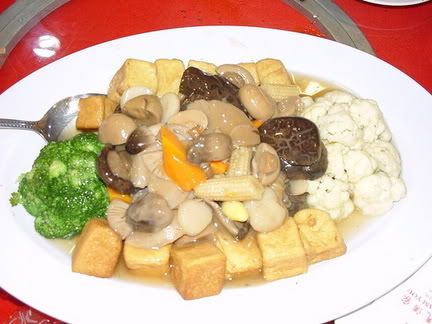
This is the Double Flower Lor Hon Chai, the vegetarian dish. The double flower refers to the cauliflower and broccoli flower at the two sides. There is a variety of mushrooms (button, straw and Chinese ones), tau foo, corn, carrots, gingko nuts and some shirataki noodles in the dish.

Image hosted by Photobucket.com

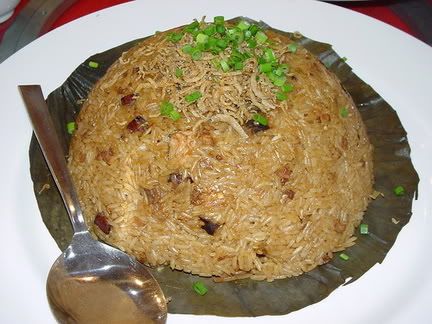
This is the last savoury dish, the Braised Perfumed Lotus Leaf Glutinous Rice. There is a sprinkling of tiny fried ikan bilis (Malay for anchovies) on top. Usually this dish will come together with the vegetarian dish.

Image hosted by Photobucket.com

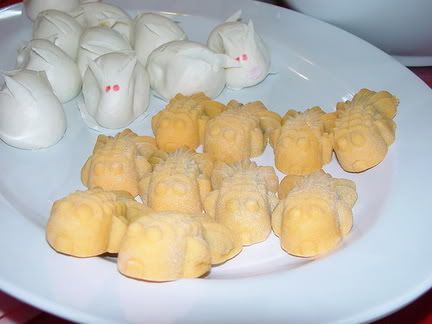
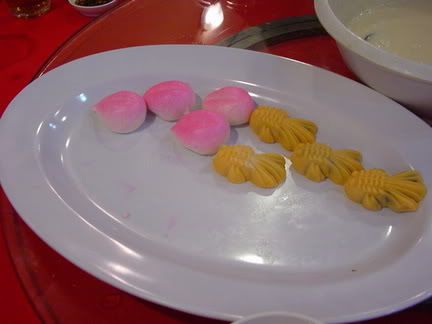
Dessert was these Steamed Little Rabbits and Little Gold Fishes. The little rabbits are actually lotus paste buns which they cut little ears and put two red dots as eyes. Very cute! The gold fishes are ping pei (Chinese for snow skin) mooncakes with a red bean filling.

Image hosted by Photobucket.com

Splashie Boy caught these different variety of the lotus paste buns which were shaped in the form of peaches. The
peaches are meant to be a symbol of longevity.

Image hosted by Photobucket.com

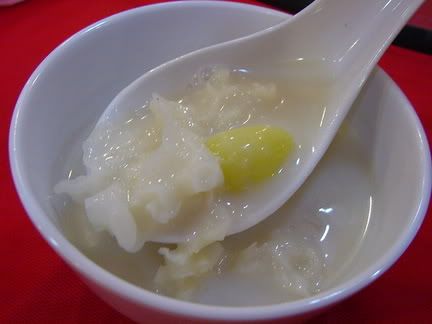
Besides the buns, they also served this dessert which was Snow Fungus, Water Chesnut and Gingko Nut in a coconut milk broth. I thought it was a tad too sweet but Splashie Boy loved it.

Image hosted by Photobucket.com

Restoran Sam You
Lot 56/58, Jalan 52/4
Section 52
46200 Petaling Jaya
Telephone: 03 - 7955 1197/7955 1179

Friday, May 20, 2005

A MaRRiAgE MaDe in HeAvEn

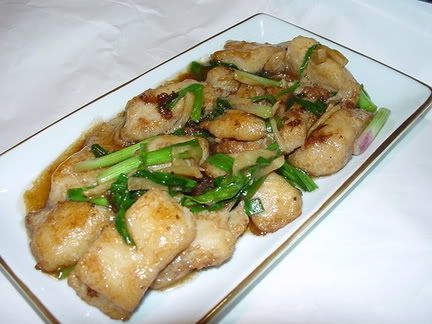
The flavours of the spring onion and ginger seem to be like a marriage made in heaven as they taste divine when you cook them together. There are so many variations you can make with chicken, beef, fish and prawns and they all taste great. You can also toss it with some egg noodles or eat it with piping hot rice.

I have a penchant for Chinese recipes but I like them in English as I'm a total banana (cannot understand Chinese characters). The local publishers seem to have recognised that there are people like me out there so they now have bilingual editions of cookbooks, in Chinese and English. I like the recipes from this magazine called Yum Yum (even the name tells you the food must be nice) as they're bilingual and they feature simple home cooked food or restaurant recipes. My fish fillet recipe is from their Hawker's Fair Simplified cookbook where they have famous dishes that most local hawkers called tai chows (Chinese for big fry) cook.

For the fish fillets, I usually use the frozen dory fish that you can easily get in supermarkets. I doubt it's actual dory as I have read it's probably catfish bred on the Mekong River in Vietnam. However, the fish is nicely filleted and deboned which is extremely important as Splashie Boy is allergic to bones in fish. If you cannot find any shaoxing wine, substitute with dry sherry, that was what I used when I was studying overseas.

If you are using beef, slice them thinly and marinate with some bicarbonate of soda, half an egg, oyster sauce, a pinch of sugar, a dash of sesame oil and some corn flour. With chicken, slice either boneless chicken thighs or breasts in strips and toss them in the same marinade as the beef but omit the bicarbonate of soda.

Fish Fillet with Ginger and Spring Onion
50ml oil
50g sliced young ginger
300g fish fillet, sliced
3 stalks spring onion, cut into 3 cm lengths

Marinade
1 egg white
1/2 tsp salt
1 tsp sugar
1 tbsp light soya sauce
dash of pepper and sesame oil
1 tsp corn flour

Seasoning
1 tbsp oyster sauce
1 tsp light soya sauce
1/2 tsp sesame oil
1 tsp shaoxing wine
dash of pepper and chicken stock granules
2 tbsp corn flour water for thickening

Mix fish fillet with marinade and season for 30 minutes. Deep fry in hot oil for one minute. Dish and drain.

Leave 1 tbsp oil in wok and saute ginger until fragrant. Add in fish fillet, spring onion, seasoning and stir fry at high heat until well mixed. Thicken with corn flour water and dish up.

Image hosted by Photobucket.com

Wednesday, May 18, 2005

PePPiNg up LiFe

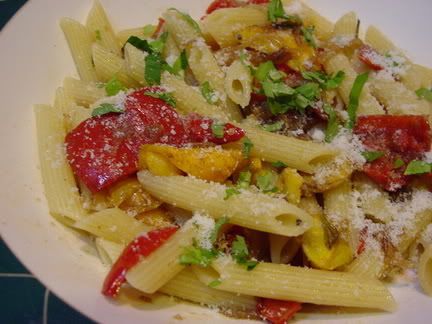
Life is so dull and dreary nowadays with the onslaught of the rainy night season. The sky always seem to turn pitch black just before work ends leading to huge traffic jams on the roads. To cheer us up, I recently made my traffic light pasta with peppers. It's actually pasta peperonata from Jamie Oliver's cookbook, Jamie's Dinners but the colors of the yellow and red peppers with a sprinkling of green parsley reminds me of traffic lights!

Jamie Oliver's recipes are all extremely simple to make and yummy to the last pasta tube. I omitted the cream and mascarpone cheese since I did not have any available. I prefer the taste of balsamic vinegar so I used that which had evaporated quite a bit hence you don't see it in the picture. To warm the pasta bowls, I usually hold them about 2 inches above the boiling pasta pot for a short while. Don't put them over the pot and leave it as the water will overboil messing up your cooker hob.

Pasta Peperonata (Serves 4)
2 red peppers, deseeded and sliced
2 yellow peppers, deseeded and sliced
extra virgin olive oil
sea salt and freshly grounded black pepper
2 red onions, peeled and finely sliced
2 cloves of garlic, peeled and grated
2 handfuls of fresh flat leaf parsley, leaves finely chopped, stalks reserved
2 tablespoons of red wine vinegar or balsamic vinegar
2 handfuls of grated parmesan cheese
optional: 2 heaped tablespoons mascarporne cheese or creme fraiche
455g rigatoni, penne or spaghetti

Put all the peppers in a large frying pan over a medium heat with a little olive oil and a pinch of salt and pepper. Place a lid on, and cook slowly for 15 minutes until softened. Don't rush this too much, as cooking the peppers slowly like this really helps to bring out the flavour. Add the onion and cook for a further 20 minutes. Then add the garlic and parsley stalks and toss around, keeping everything moving in the pan. Cook for about 3 minutes more. Have a little taste, and season with a bit more salt and pepper. Add the vinegar - it will sizzle away, so give everything a good toss. Then add one handful of the grated parmesan and the mascarpone or creme fraiche if you are using it and turn the heat down to minimum while you cook the pasta.

Meanwhile put a large pot of salted water on to boil. Add the pasta to the boiling water and cook according to the packet instructions. When cooked, drain in a colander, reserving some of the cooking water. Put the peppers, pasta and parsely leaves into a large warmed bowl. Give them a good toss together, then add a little pasta cooking water and few lugs of extra virgin olive oil to coat the pasta nicely. Serve straight away, sprinkled with the rest of the Parmesan.

Image hosted by Photobucket.com

Monday, May 16, 2005

BluR LiKe SoToNg

Nope, I'm not "blur like sotong" but I could not resist that little quip about it since this posting is about sotong (Malay for squid). The term "blur like sotong" is from Singlish, a kind of Singapore English slang and means a person is clueless or completely dazed from the real world.

One of our regular makan (Malay for eat) places is Muhibbah Seafood in Taman Tun Dr Ismail, Kuala Lumpur. Originally a roadside stall, they have now expanded to two shop lots in this suburb. The food is enjoyed by everyone and is very muhibbah (Malay for unity among races). Recently, it was voted Best Halal Chinese Restaurant by the guidebook,
Halal Food, Kuala Lumpur: A Guide to Good Eating.

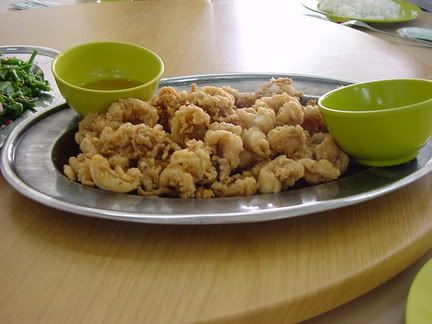
Based on my tastebuds*, they serve the best deep fried sotong in town as the sotong is crispy with a light batter. It is completely different from the deep fried sotong you get at the Chinese restaurants which I find chewy and the batter to be too thick. Eat it piping hot with the dipping sauce (in the green bowls) that are slightly sourish with a smidgeon of chopped chillis.

Image hosted by Photobucket.com

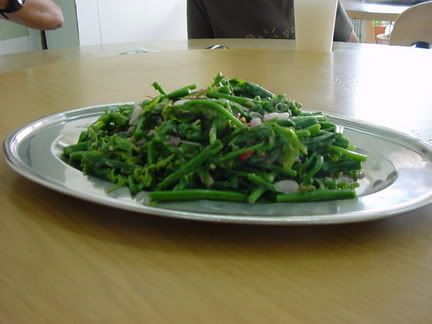
Another popular dish is the kerabu paku pakis (Malay for fern shoots). The refreshing dish is paku pakis tossed in some coconut milk, chopped chilli padis (small fiery chilis with an extra kick) and chopped shallots. The paku pakis is not available in supermarkets but can be found occasionally in pasar malams (Malay for night markets) or pasar tani (Malay for agricultural markets).

Image hosted by Photobucket.com

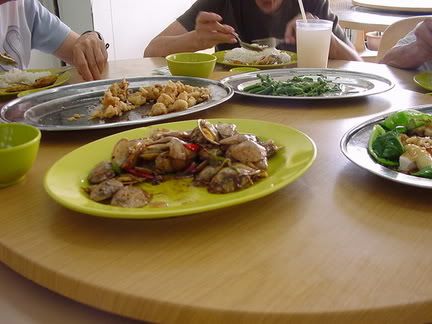
The food is dissapearing from the plates faster than we can take the pictures! Another great dish is the fried lala (clams) in black bean sauce, onions and peppers.

Image hosted by Photobucket.com

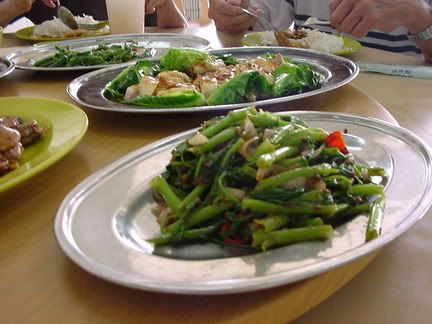
In the background, is the steamed kampung chicken with blanched brussel sprouts. A kampung chicken is like a free range chicken as it is allowed to roam freely in the kampung (Malay for village). The chicken is served with oyster sauce and a sprinkling of fried garlic on top. In the foreground is the kangkong belacan, a dish where kangkong (Malay for water spinach) is fried with sambal belacan.

Image hosted by Photobucket.com

The restaurant is open for lunch and dinner. At night, they serve grilled fish with banana leaf.


Muhibbah Seafood
60 & 62, Lorong Rahim Kajai 14
Taman Tun Dr Ismail
60000 Kuala Lumpur
Telephone: 03-7727 3153

* Disclaimer: Every individual has different tastes and views of the food they sample.
This is based on my own unique experience.

Sunday, May 15, 2005

LooK Ma, no FLoUr

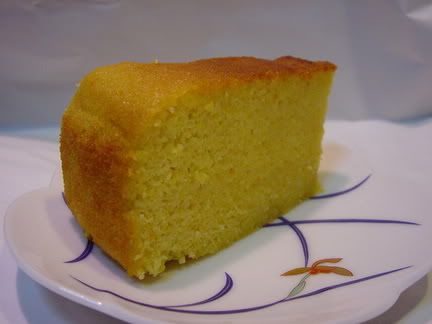
I have been keen to try my hand in making the flourless orange cake since tasting it at Delicious by Ms. Read's cafes at 1 Utama and Bangsar Village. Flipping through my cookbooks, I noticed that Nigella Lawson has her version called a Clementine Cake from her How to Eat cookbook. Clementines are from the mandarin orange family and are quite similar to the smaller and sweeter honey mandarin oranges we get during Chinese New Year. In the UK, they are extremely popular during Christmas. In the absence of clementines, you can substitute with oranges or lemons.

The recipe was extremely simple with a short list of ingredients. As flour and butter has been omitted, ground almonds was used to bind all the wet ingredients together. The only downside is you need to boil the oranges in water for approximately two hours for it to soften so you can use the pulp. Besides the long time needed, the smell of the oranges boiling is horrible, kinda like boiled dirty socks. Other alternatives have been suggested on forums that discuss Nigella's recipes such as microwaving the oranges but I decided to stick to the conventional way. When you choose the oranges, make sure they are the thin skinned ones. For my cakes, I used the Sunkist ones as those were the thinnest skin I could source for currently.

Nigella's recipe, if any of you have seen the television show calls for you to process all the ingredients in a food processor. Since my food processor is too small to that, I did it the conventional way and beat it in a bowl with my hand mixer. The cake came out looking beautiful but when I cut a slice, it was too moist. It didn't have the nuttiness of the cake I had in Delicious so it was back to the drawing board.

Skimming through the internet, there are so many different versions of the cake. There was one with ginger from
Chocolate & Zucchini, one with poppyseeds and various others with slight variations to Nigella's recipe. I liked what Jill Dupleix did in her version, seperating the eggs and folding the egg whites in hence I borrowed her technique for the cake. I also took the advice from the forum members of Nigella's website and squeezed out the juice from the boiled oranges. At the suggestion of my mother, I switched to 6 medium eggs compared to the large ones I used in my first try.

The second cake was much better, the folding in of the egg whites made the batter lighter and it was less moist. The texture of the cake was exactly like the one served in Delicious minus the almond niblets. So here's my version of the cake which I hope you will enjoy:

Flourless Orange Almond Cake
2 oranges with a weight of 375grams
6 medium eggs
250 grams sugar
250 grams ground almond
1 heaped teaspoon baking powder

Put the oranges in a pan with some cold water, bring to the boil and cook for 2 hours. Make sure the oranges do not split as if they do, this will make your orange bitter as the taste will be from the orange peel. If you want to cut the time, you can boil the oranges in a pressure cooker for half an hour or prick the oranges and microwave them for approximately 4 to 5 minutes, turning them after 2 minutes. Make sure the oranges are soft before you blitz them. Drain and, when cool, cut each orange in half and remove the pips. Make sure you squeeze out the juice and excess water or your cake will be too moist. Dump the oranges - skins, pith, fruit and all - and give a quick blitz.

Preheat the oven to gas mark 5/190ºC. Butter and line a 21cm Springform tin. Seperate the eggs into two bowls. Beat the egg yolks with sugar in a large bowl until pale. Beat in the pulped oranges, the ground almonds and the baking powder. In a seperate bowl, beat the egg whites until soft peaks. Fold gently and slowly into the mixture.

Pour the cake mixture into the prepared tin and bake for an hour, when a skewer will come out clean; you'll probably have to cover with greaseproof paper or foil after about 40 minutes to stop the top burning. Remove from the oven and leave to cool, on a rack, but in the tin. When the cake's cold, you can take it out of the tin. If you want, you can add almond niblets or sift icing sugar on top of the cake as decoration.

Yummy cake to be enjoyed with a hot cup of tea or coffee.
Image hosted by Photobucket.com

HaLoScAn CoMMenT is Up and RuNNinG

I have been getting some feedback that the comment boxes are confusing as there are two; one from Blogger and one from Haloscan. To avoid any more confusion, I have de-activated Blogger's comment box leaving the one from Haloscan only. The Haloscan one is much more flexible as you can leave your comments even though you are not a blogger member.

Happy Commenting!!


Saturday, May 14, 2005

SoUp Me Up

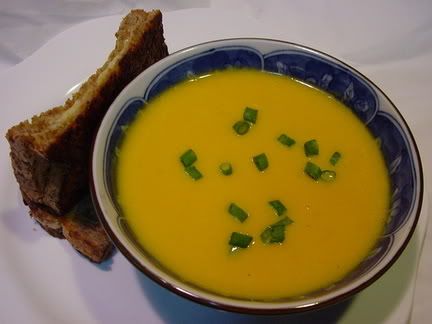
The weather has been pretty haywire, some days the heat is unbearable while other days you get torrential rainstorms. One rainy night, I had the urge to have a nice hot soupy dinner. Digging through my fridge, I found half a pumpkin lurking at the bottom and a bunch of spring onions. Skimming through my recipes and pantry, it looked like I could rustle up a quick pumpkin soup from a Delia Smith cookbook.


Most recipes for pumpkin always recommend you use butternut as it's sweeter than a normal pumpkin but I find them way too expensive for me. Instead, I use a local pumpkin that looks like a butternut with a light brown skin. It's also taller than the usual rotund local green pumpkins you get at the wet market. The best thing about pumpkins is they can keep for a long time. Whenever I see any of these pseudo-butternut pumpkins in the wet market, I pick up a few and leave them at my sideboard for a few weeks to a month. Check on your pumpkin occasionally to ensure that it is not too ripe. Once it is cut, you can also keep it wrapped up in some cling film in your fridge.

I also made some toasted cheese sandwiches, just grab some bread and put a slab of cheese between two pieces of bread. Butter the outside of the bread and heat up a frying pan. Put the buttered side on the hot pan and press down to brown. The cheese will melt inside. Turn it over to the other buttered side once it is browned and repeat for the other side. You can experiment with different breads and cheese for a nice toasted sandwich. Since I had a loaf of 7-Grains Sprouted Bread from Adventist Bakery, I used that and cheddar cheese from my fridge.

The recipe below does call for sweetcorn which I did not have any that night and had to do with chopped spring onions. Do try it with the toasted sweetcorn as it adds a nice touch to the creamy soup.

Pumpkin Soup with Toasted Sweetcorn
700g pumpkin (peeled, deseeded and chopped into one inch dice)
570g sweetcorn (off the cobs, approximately 5 to 6 cobs)
25g butter
1 medium onion (peeled and finely chopped)
275ml whole milk
725ml stock
1 teaspoon melted butter for toasting the sweetcorn
salt and freshly milled pepper

Begin by melting the butter in the saucepan, then add the onion and soften it for about 8 minutes. After that add the chopped pumpkin along with half the sweetcorn, then give everything a good stir and season with salt and pepper. Put the lid on and, keeping the heat low, allow the vegetables to sweat gently and release their juices – this should take about 10 minutes. Next, pour in the milk and stock and simmer gently for about 20 minutes. Put the lid on for this but leave a little gap (so it's not quite on) because, with the presence of the milk, it could boil over. Keep a close eye on it anyway.While that's happening, pre-heat the grill to its highest setting for 10 minutes. Mix the rest of the sweetcorn with the melted butter, spread it out on a baking tray, season with salt and pepper and pop it under the hot grill about 3 inches (7.5 cm) from the heat – it will take about 8 minutes to become nicely toasted and golden, but remember to move the sweetcorn around on the baking tray halfway through.When the soup is ready, pour it into a food processor or blender and blend it to a purée, leaving a little bit of texture – it doesn't need to be absolutely smooth. You will probably need to do this in 2 batches. Serve the soup in warm bowls with the toasted sweetcorn sprinkled over.

Here's my bright yellow pumpkin soup (looks like Splashie the car) and my toasted cheese sandwich. It was creamy and thick, so satisfying on a cold rainy night.
Image hosted by Photobucket.com

Friday, May 13, 2005

PoPeYe's FaVoURitE fOOd

Do you remember those Popeye the sailor cartoons? He was always getting bashed up by Brutus when he tried to save his gal, Olive Oyl in some silly situation. Well, in his cartoon world, his favourite food was spinach in a can which gave him superhuman strength to beat up Brutus and win his gal back.

Although in real life, spinach can't transform us immediately into a superman/woman, those Popeye cartoons were right as eating spinach is good for us as it is packed with nutrients. These nutrients like lutein, vitamin C, folate and iron can help prevent heart disease, osteoporosis, cancer and even arthritis.


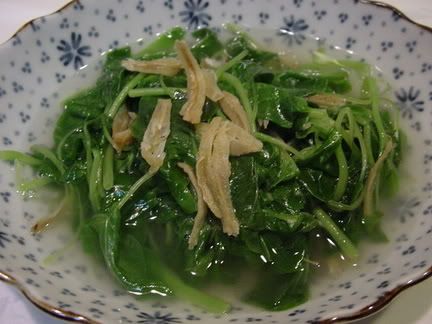
There are various ways to cook spinach but I love it with stock made from anchovies (ikan bilis in Malay) which I find is sweeter than chicken stock. There is always a jar of fried ikan bilis in my fridge courtesy of my aunt so whipping up the stock is easy peasy. Sometimes when I make fried rice, I will sprinkle some fried ikan bilis on top and it's pure bliss.

This method of cooking the spinach is quite popular in the Chinese restaurants in Malaysia. Some restaurants will also add a cut up century egg on top as additional flavour.
In Cantonese, it's called siong tong (soup) yin choy (spinach). I am quite partial to baby spinach vs spinach as I hate spending time picking out the tough and old parts of the spinach.

Chinese Spinach in Stock
1 tbsp oil
1 tbsp sliced garlic
800ml stock (preferably made from ikan bilis)
500g Chinese baby spinach

Heat the oil in a saucepan and saute the sliced garlic till fragrant. To make the stock, add the fried ikan bilis in the saucepan with the garlic and pour 800ml boiling water from the kettle. Be careful when you pour in the water as it may sputter and sizzle for a short while. Let the stock boil. Once the stock is boiling, put in the spinach and cook for about 3 minutes. Add in salt to taste and dish up.
If you like, you can also sprinkle some fried ikan bilis on top of the dish.

Image hosted by Photobucket.com

Tuesday, May 10, 2005

TrYiNg to be a GooD JaPaNeSe HoUsEwIfE

I recently found out that one of the criterias of a good Japanese housewife is you must know how to cook Niku-Jaga and miso soup from Obachan's blog. Since I can cook a decent but not brilliant Niku-Jaga, I guess if Splashie Boy and I part ways, I can opt for a Japanese husband instead.

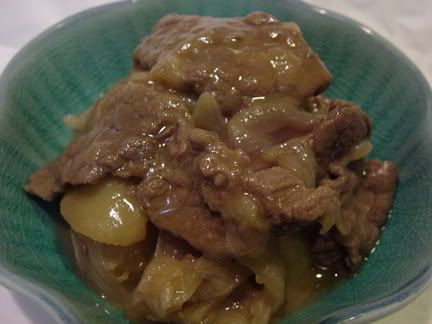
Niku-Jaga is a popular Japanese dish of braised beef (niku) with potatoes (jagaimo). You don't get this in many Japanese restaurants in Malaysia as this is home cooked food. I learnt to cook it from this excellent cookbook called Japanese Homestyle Cooking by Tokiko Suzuki. The book was a real gem that I had found in a Times Bookshop warehouse sale many moons ago. It's an excellent book for a dummy like me as it has step-by-step techniques in pictures.

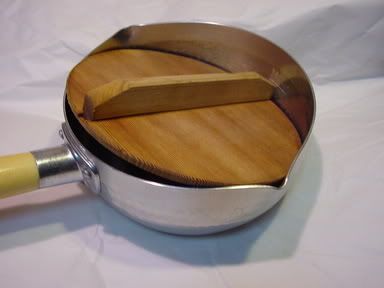
This cookbook introduced me to the method of using a drop-lid (otoshi buta) and a Japanese alumminium pan (seen below) in cooking Japanese food.


Image hosted by Photobucket.com

I was lucky to get the pan and the drop-lid as Splashie Boy got them from Tokyo for me in one of his previous trips. Unfortunately the drop-lid is a tad too big for the pan but I still use it.

The drop-lid is used to float on top of the liquid in a pot when simmering food. This is to ensure that the heat is evenly distributed and keeps the ingredients underneath it in it's original shape. Besides a wooden drop-lid, you can also use a sheet of tough cooking paper or aluminum foil. For instance, if you are simmering fish in a pot, it is advisable you use aluminum foil instead of a wooden drop-lid so the fish is not crushed.

For the beef, I used the yakiniku slices from Jusco which are not as razor thin as Yoshinoya's beef bowl (gyu don). Russett potatoes was used as they give a nice floury texture after they have been simmered.

The Japanese ingredients are sourced from either Jusco, Isetan or Kiara Supermarket. I used to get my sake in a carton from alcohol shops but I recently managed to find cooking sake in Isetan, which is much cheaper. Dashi stock can be bought in powder form or in a packaging that look like teabags. I prefer the powder type and one pouch has smaller packets that you can use for each meal. Refer to the white stickers on the back of the pouch which translate for you what is inside. I usually get the konbu dashi(in a green packet) rather than the ones made from fish or sardines as they smell too fishy for me. The mirin and soy sauce, I use Top Valu,Jusco's house brand. In the recipe below, I find 3 tablespoons of sugar too sweet for my liking so I have adjusted it to 1 1/2 tablespoons instead.

Niku-jaga
200g sliced beef
400g potatoes, peeled and cut in bite sized pieces
200g onion, cut into 1 cm wide slices
1/2 tbsp oil

Simmering stock
2 cups dashi stock
3 tbsp sake
3 tbsp sugar
2 tbsp mirin
3 tbsp soy sauce

Heat the oil in a pan. Remove from heat to a wet dishcloth and cool it to prevent the beef from sticking to the bottom. Add the beef and coat with oil, seperating with chopsticks. Return pan to moderate heat and brown the beef, stirring.

When the beef changes color, add the onion and potatoes. Saute them stirring with a wooden spatula. Once the onion and potatoes are slightly colored, add just enough dashi stock to cover all ingredients. Bring to a boil over high heat, skimming off any scum that forms. Add the sake, sugar, mirin and soy sauce in this order.

Lower the heat slightly and bring the mixture to a boil. Skim off remaining scum and cover with a moistened drop lid. When the liquid is reduced to one third, you can flip the ingredients over to evenly coat the food. Hold the handles of the pan with both hands and shake it. Don't use a spoon to stir it as the potatoes will break up.

Braise over high heat, slanting the pan until the liquid has been absorbed. Transfer to a flat container and spread. (Don't leave it to cool in the pan as it gets soggy) When cooled, you can enjoy delicious niku-jaga.

Yummy licious niku-jaga which we thoroughly enjoyed with a bowl of hot rice.
Image hosted by Photobucket.com


Saturday, May 07, 2005

PoRtoBeLLo LuNcH

Nope, we did not fly to London to have lunch at Portobello Road but how I wish we did! Instead we had grilled Portobello Mushrooms for lunch which was extremely easy to rustle up. I've been eyeing the mushrooms for a while in the supermarket but have yet to try them out. However after reading Nigel Slater's Real Food's description of the sandwich which he had pinched from Nigella Lawson's How to Eat, resistance was futile as any Trekkie will tell you.

These mushrooms are the largest ones in town and are basically the big brother/sister of the brown mushrooms. Sometimes vegetarians use them as a beef subsitute as they have a meaty texture. For the sandwich, we used ciabatta bread which is now easily available at Delifrance shops for RM2.00. There seems to be a ciabatta war going on in Bangsar Shopping Centre though, you can now get ciabatta for RM1.99 at the new bakery inside Cold Storage. I suspect that competitive pricing recently spurred Delifrance to reduce their initial price for ciabatta from RM2.50 to RM2.00 for all their outlets.


Hot Mushroom Sandwich

1 large flat portobello mushroom
Large knob butter
1 large clove garlic
chopped 1 tbsp chopped flat leaf parsley
1 small crusty roll or ciabatta
Dijon mustard
Lemon Juice
Salt
Chopped lettuce ( optional)

Preheat oven to 200C/Gas 6. Put mushroom on a baking tray and cover with butter, chopped garlic and parsley. Cook for about 20 minutes. Cut open a small roll and wipe the cut side all over the pan to soak up the juices. Smear with dijon mustard, top with the mushroom, squeeze with lemon juice, season and add some chopped lettuce. Eat immediately.

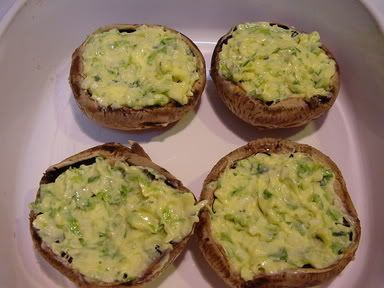
This is the assembled mushrooms before they went inside the oven.

Image hosted by Photobucket.com

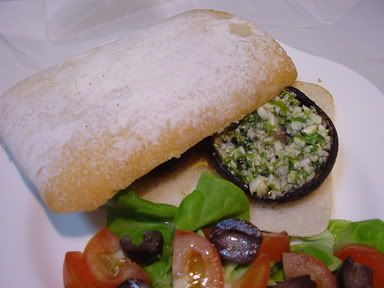
Mushrooms on top of the ciabatta which I smeared lightly with some mustard. I made a simple salad from butterhead lettuce, tomatoes and black olives drizzled with some olive oil to go with the sandwich.

Image hosted by Photobucket.com

It was divine with all the garlicky juices dripping out from the mushroom so your bread is not too dry but crusty on the outside. Incidentally, the juices are all inside the mushrooms so when you bite into it, they ooze out.

Tuesday, May 03, 2005

An EnGLiSh SuPPeR

It is a long weekend in Malaysia with the celebrations of Labour or Workers' Day on Sunday. After a long day traipsing around the malls to shop in the sales, we settled for an old favourite of ours, Bangers and Mash for dinner.

Getting the right kind of sausages for us is always a major headache in KL. Most places sell the processed meat kind while few places only make fresh sausages from minced meat. After scouting around, we narrowed it down to two places which do decent sausages; Cold Storage in Great Eastern Mall, Ampang and Mr. Ho's Fine Foods in Bangsar Shopping Centre. As we were in KL on Sunday, we made a trip to Great Eastern Mall to check the sausages. To our dissapointment, they have stopped making them fresh and were taking them for an external supplier. In the end, we had to settle for Ayamas Premium Sausages which was the next best alternative as we did not want to make a detour to Bangsar.

I regularly use the recipe from Jamie Oliver's latest cook book, Jamie's Dinners which I adapt accordingly to whatever sausages I can get my hands on. His recipe actually calls for long Cumberland Sausages which we do not have in Malaysia(the closest I can think of is footlong sausages!) and roasting them with herbs and garlic in an oven. If I use the sausages from Mr. Ho's, I would roast them as the herbs add a nice flavour to the sausages. However, as we could only get our hands on Ayamas Premium Sausages, I will fry them in a frying pan on slow heat to let their skin burn so it gets slightly crispy. We used Cheese flavoured ones as I love the cheese oozing out when you cut them up.

Jamie's recipe is actually for four people so I reduce the portions accordingly to fit the two of us. We use USA Russett Potatoes for the mash as that is the best potato for the job. I added full cream instead of milk since we had that in the fridge. Another variation to my mash is I will heat up the butter and cream first, then add the cooked potatoes to mix and mash. I omit the horseradish as we prefer to have it plain.

The Best Sausage and Mash with Onion Gravy

2 long rounds Cumberland Sausages
2 cloves of garlic, finely sliced
Bunch of fresh sage, leaves picked
Wooden skewers
Bunch of fresh rosemary, leaves picked
Olive oil to drizzle
2 kg peeled potatoes
300 ml milk
70g butter, plus a knob for the gravy
6 tbsp horseradish, either freshly grated, jarred or even creamed
4 red onions, cut in half and finely sliced
5 tbsp cheap balsamic vinegar
2 beef or chicken OXO cubes

Preheat your oven to 200C/fan 180C/gas 6. Roll your sausages in a Catherine wheel, pushing in the sliced garlic and sage as you roll it up - this will give you terrific flavour. Secure with a couple of skewers or some sharp rosemary stalks. Drizzle with olive oil, sprinkle with rosemary and place on an oiled baking tray or ovenproof pan. Cook for 20 minutes until crisp and golden.

While your wheel is roasting, chop your potatoes into small dice and boil in salted water until cooked, then drain them well. Mash the potatoes until smooth, adding the milk, butter and horseradish. Season well to taste and keep warm with a lid on, on the back of the stove.

Making the gravy is simple: fry the onions for about 10 minutes with a lid on until soft. Then take the lid off, turn and the heat up and as soon as the onions brown, chuck in the vinegar and boil it down untl it has almost dissapeared. Turn the heat back down and add a nice knob of butter, crumble in the stock cubes and some water and stir well. Let everything simmer to a nice gravy consistency. To serve, dollop some potatoes on the plate, chop up the sausage and pour over the gravy.


Image hosted by Photobucket.com

There you have it, like Jamie says, this is proper comfort food. Heaven on a plate when you are feeling super depressed and the rain is pouring down in a storm like last night.

Sunday, May 01, 2005

TeReNgGaNu SpEcIaLtY

We came across this Terengganu specialty, Sata by chance today when we wandered through the tiny roads around Kampung Baru in Kuala Lumpur.

Terengganu, is one of the states that form the East Coast of Peninsular Malaysia. As it is a coastal state and isolation from the bustling east coast, fishing and farming are the main livelihood of the people. Hence fish, coconut and rice feature quite heavily in their local dishes. Their most famous product from Terengganu is Keropok Lekor made from fish paste and sago that is deep fried. When you drive along the coastal roads of Terengganu, you will past by small villages who cook their own keropok lekor and sell them.

Although I have sampled keropok lekor at these roadside stalls, this is the first time I came across this particular food, Sata. I understand that this is also sold at the stalls and is extremely popular among the locals in Terengganu. With the migration of Terengganu locals to Kampung Baru, the Malay village within the city centre, Kl-lites can now enjoy these Terengganu gastronomic delights.

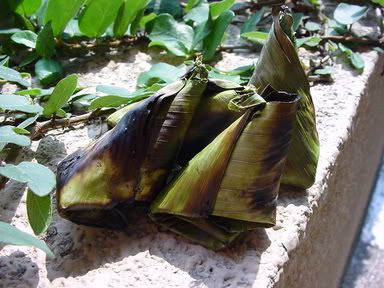
The Sata stall is found at the junction between Jalan Raja Uda and Jalan Mahmud where a man is tendering over a charcoal fire and grilling skewers of the small parcels of Sata. You can get four small Sata in a triangular shape wrapped in banana leaves for a sum of RM1.50. The stall is open from tea time to the evening onwards.


Image hosted by Photobucket.com

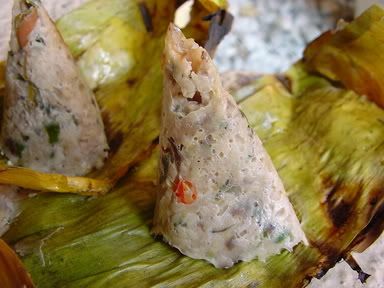
After you remove the slightly singed banana leaves, you will get little pyramids of fish meat and grated coconuts as below. The smell of the Sata is unbelievable and it is best eaten hot from the grill.

Image hosted by Photobucket.com
If any of you are interested in making Sata at home, try this recipe which I found from my Flavours magazine. It's quite simple and may make a great variation to your home barbeque.

Sata (Grilled Fish and Coconut Parcels)

500 grams mackarel (kembung, tenggiri or selayang)
200 grams grated coconut (white part only)
2 cm ginger
6 shallots
1 clove garlic
1 tumeric leaf, finely sliced
1 teaspoon chili powder
salt and sugar to taste
2 red chillies, sliced
banana leaf for wrapping
bamboo skewers, cut 20 cm long

Clean and debone fish. Combine the fish meat, grated coconut, ginger, shallots, garlic and turmeric leaf in an electric blender and process to a paste. Season to taste with chili powder, sugar and salt. Cut the banana leaf into 23 x 15 cm rectangles. Pass the leaf briefly over a flame or dip into hot water to soften it. Fold a piece of banana leaf into a cone and fill it with the fish paste. Top with two or three slices of chili. Fold top to close the package and stand it on its base.

Thread several parcels from the base through a bamboo skewer. Grill over a medium fire, turning over once or twice, for 5-10 minutes , or until cooked. Serve as a savoury snack.

HeAlThY BiTteR GoUrD

One of my all-time favourite local dish is stewed bitter gourd with chicken and black beans. Recently, my mum decided on the spur of the moment to cook up the dish so I had an impromtu cooking lesson.

Bitter gourd (Peria in Malay and Foo Gwah in Chinese) is a dish that is an acquired taste as some people avoid it due to it's bitterness. In fact, it was not a favourite of mine when I was young as I felt it was too bitter. However, after trying it a few times, I grew to like eating it and it's a firm favourite of mine now. Bitter gourd contains loads of healthy vitamin A, B1, B2 and C and minerals like calcium, phosphorous, iron, copper and potassium. The Chinese and even Ayurvedic practitioners believe that the bittergourd has detoxification properties that help cleanse your blood, enhance your digestion and improve your liver condition.

For the Chinese, bitter gourd is popularly used in Yong Tau Foo where it is stuffed with fish paste and then fried. It can also be stewed with black beans with chicken or pork ribs. You can also make an open faced omelette with bitter gourd and prawns . The Indians usually slice the bitter gourd thinly and fry them after dusting them with a light batter. It complements your banana leaf rice perfectly. However, not all Indian restaurants do it well, as some have too thick a batter or don't taste freshly fried. For me, I am especially partial to the ones made by Achas in Section 5, Petaling Jaya which I think are the best I have tasted so far.

This recipe can be made with chicken or pork ribs. The black beans add flavour to the bitter gourd which is softened by simmering it under a slow fire for about 20 to 25 minutes.

Stewed Bitter Gourd and Chicken with Black Beans

1 large bitter gourd, approximately 300 to 400 grams
400 grams of chicken whole legs, cut into bite sized pieces
1/2 tsp salt
4 cloves of garlic, minced
a knob of ginger the size of 1/2 inch, minced
1 tbsp of black beans
1/2 tsp sugar
1 tbsp oyster sauce
1 cup water

oil

Halve the bittergourd lengthwise. Remove the seeds with a spoon and cut into 3mm slices at a slant. As some people find the gourd too bitter, you can try this method to remove some of it's bitterness. Sprinkle salt into bittergourd slices and leave aside for five minutes. Rinse off salt and drain.

Heat oil in a wok and fry the ginger and garlic till fragrant. Rinse the black beans in water and chop them roughly. Mix these with the ginger and garlic mixture and stir fry. Add the cut up chicken and bitter gourd and mix the ginger, garlic and black beans thoroughly. Keep stir frying it for a two minutes, then pour in the water. Add the sugar and oyster sauce and mix it in. Bring the mixture to a boil. Reduce the heat and simmer covered. Check constantly to make sure there is sufficient gravy and add water if necessary. Once the gravy turns thick and the bitter gourd has softened, you can turn it off. Dish and serve.


Image hosted by Photobucket.com
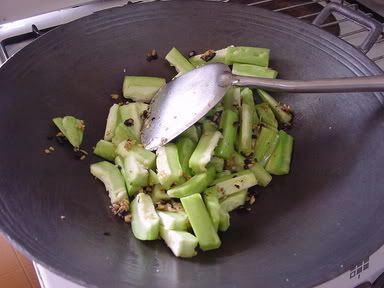
Stir frying the ginger, garlic, black beans and bitter gourd. Slight variation to the recipe, my mum had earlier cooked a batch of stewed bitter gourd with chicken and black beans but she wanted to add more bitter gourd, so she cooked up a batch and stewed it first before mixing in the old batch.

Image hosted by Photobucket.com
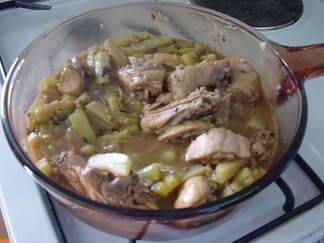
Final product of the stewed bitter gourd and chicken with black beans. Note that we had a slight mishap during cooking as we ran out of gas, so we had to switch to a pot and use the electric hob to cook the bitter gourd and chicken.

The dish was YUMMY!! Kept picking out the bitter gourd instead as that's the best part of the dish. If you have leftovers, keep them in the fridge as the dish tastes even nicer the next day when heated up and served with piping hot rice.